MakeCode Office Space
Introduction
Microsoft MakeCode (makecode.com (opens in new tab)) is a web-based learning environment for kids and teens to create with technology. MakeCode takes a unique approach to computing education by combining the magic of making with the power of code as a way to make learning about computers and technology more accessible and interesting to a wider audience.
The MakeCode team at Microsoft is small, but mighty! We are passionate about making technology fun, exciting and accessible for all kids. We work in a fun office space at Microsoft campus in Redmond, Washington and love coming to work every day!
Over the next few weeks, we’ll be publishing some easy MakeCode projects that you can do with your kids at home over the summer using a different MakeCode product each week.
Grab your kids and a glue gun and come on the Summer of MakeCode tour with us!
– The MakeCode Team
Weekly Projects
Week 1: Micro:Pet
Week 1: Micro:Pet

If your kids are like mine, they’ll spend a few minutes playing with their fancy toys, and a few hours playing with good old-fashioned cardboard boxes, string and markers in the garage!
Micro:Pet is a fun project that gets your kids’ creativity flowing using materials you can find around the house while incorporating electronics and coding concepts and activities with the micro:bit.
For the Micro:Pet project, you’ll need:
- A computer with internet connection and USB port
- A micro:bit Go Kit (available at Microcenter.com (opens in new tab)) that includes a micro:bit, a USB cable, a battery pack and batteries
- Small cardboard boxes, toilet paper rolls, paper cups/bowls or anything you have around the house to construct your pet with
- Markers, pipe cleaners, googly eyes, colored paper, feathers and anything else you have on hand to decorate your pet!
Microsoft Research Podcast

AI Frontiers: Models and Systems with Ece Kamar
Ece Kamar explores short-term mitigation techniques to make these models viable components of the AI systems that give them purpose and shares the long-term research questions that will help maximize their value.
Check out our fun video about our micro:pets!
Step 1: What’s your dream pet?
The first thing you’ll want to do is think about what kind of pet you want to create. It could be something you’ve always wanted to have as a pet, but couldn’t – say a unicorn, a dragon or a skunk.
Step 2: Make your pet
Using the materials at hand, create your dream Pet. Remember to include enough space in your design to attach your micro:bit and the battery pack.
Step 3: Code the micro:bit
If you have a Windows 10 computer, you can download and install the micro:bit app at http://aka.ms/microbitapp (opens in new tab). Otherwise, go to https://makecode.microbit.org/ (opens in new tab).
You can use your micro:bit in many different ways on your pet. Here is an example of a program for your Micro:Pet, but be creative and come up with your own unique project!
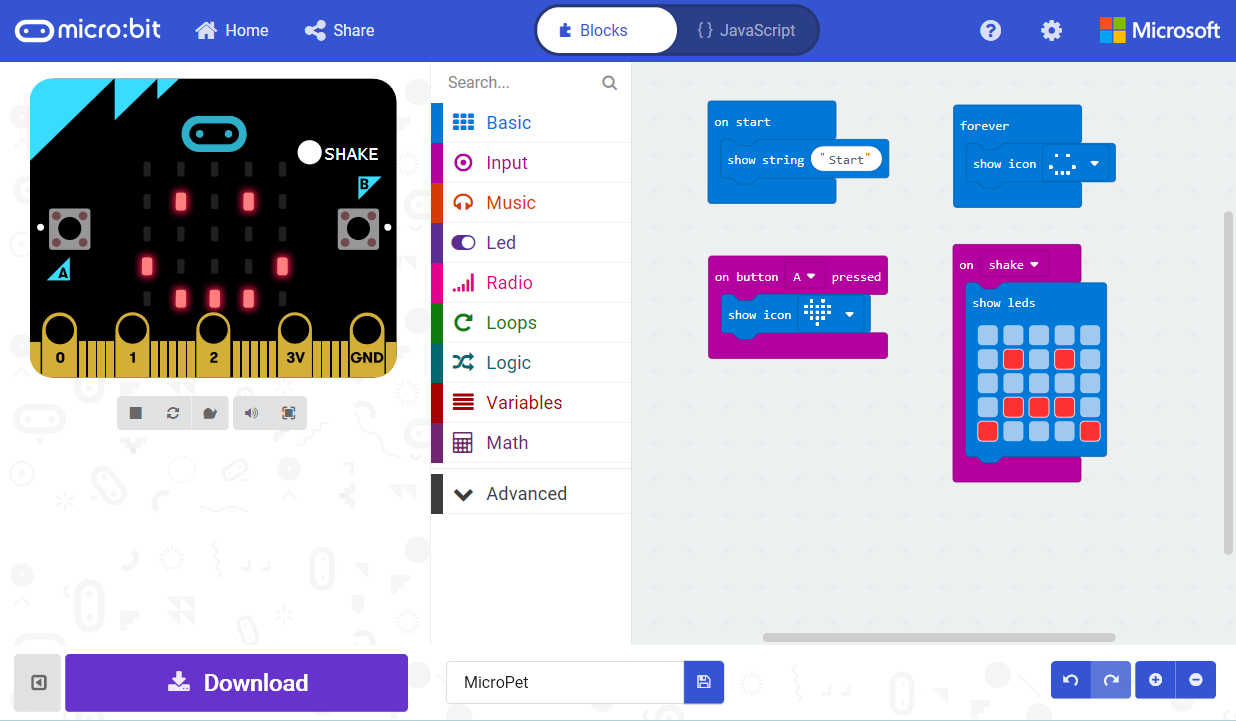
Figure 1 – An example of a Micro:Pet program. Don’t miss the video at https://youtu.be/Sd_hB4nyUXI (opens in new tab)
Optional steps:
1. Adding audio
You can add audio and play sounds through your micro:bit by connecting it to headphones, earbuds or an external speaker. Note: there is only one volume level at which the micro:bit plays – and it is very loud! Don’t put earbuds in your ear when you run your program. In addition to the micro:bit, you will need:
- Headphones, earbuds, or a speaker with an audio jack
- alligator/crocodile clips (for example, see https://www.amazon.com/WGGE-WG-026-Pieces-Colors-Alligator/dp/B06XX25HFX/ (opens in new tab))or
- A headphone adapter (see http://microbit-accessories.co.uk/shop/music/headphone-adapter/ (opens in new tab))

Figure 2 – What you’ll need for sound. Don’t miss the video at https://youtu.be/Wx73kbW5s9E (opens in new tab)
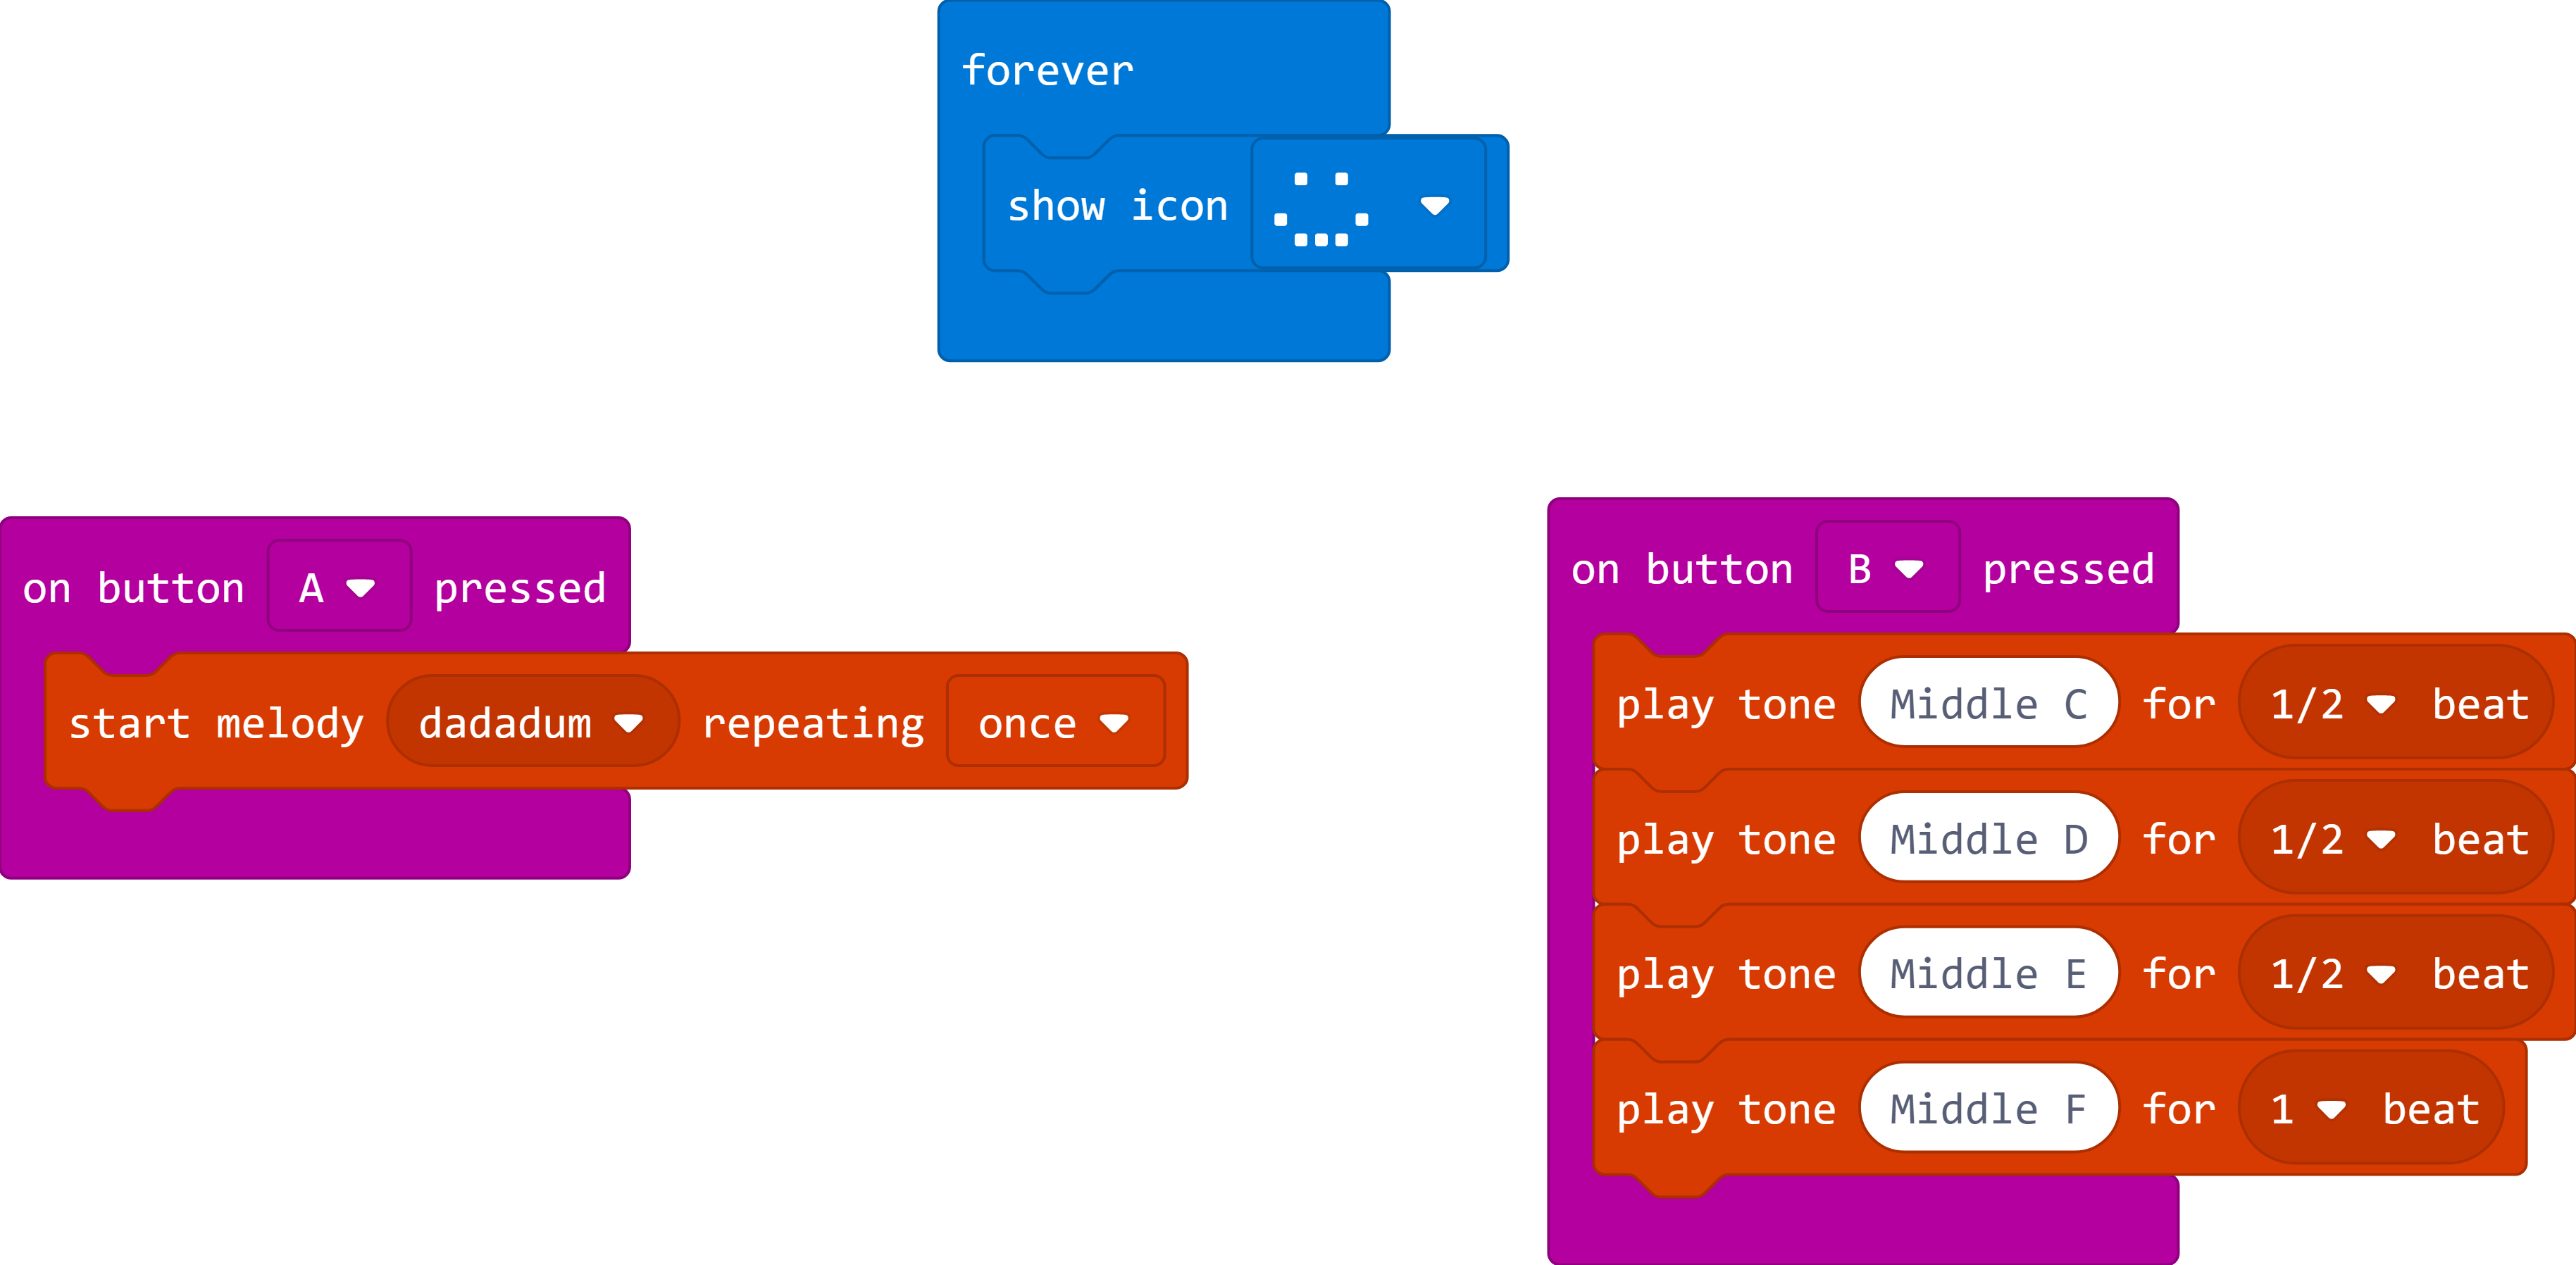
Figure 3 – Example program using sounds.
2. Adding motion
You can add motion to your Micro:Pet – for example, wagging its tail when your pet is fed. To do this, you will need to attach a servo motor to your micro:bit. You will need:
- A 180-degree servo motor (see https://www.amazon.com/J-Deal-Micro-Helicopter-Airplane-Controls/dp/B015H5AVZG/ (opens in new tab))
- 3 alligator-to-male connector cables (see https://www.amazon.com/Alligator-Clip-Pigtail-10-Pack/dp/B07C6YHB9S/ (opens in new tab))

Figure 4 – What you’ll need to put your pet in motion. Don’t miss the video at https://youtu.be/qdX86in2YXo (opens in new tab)
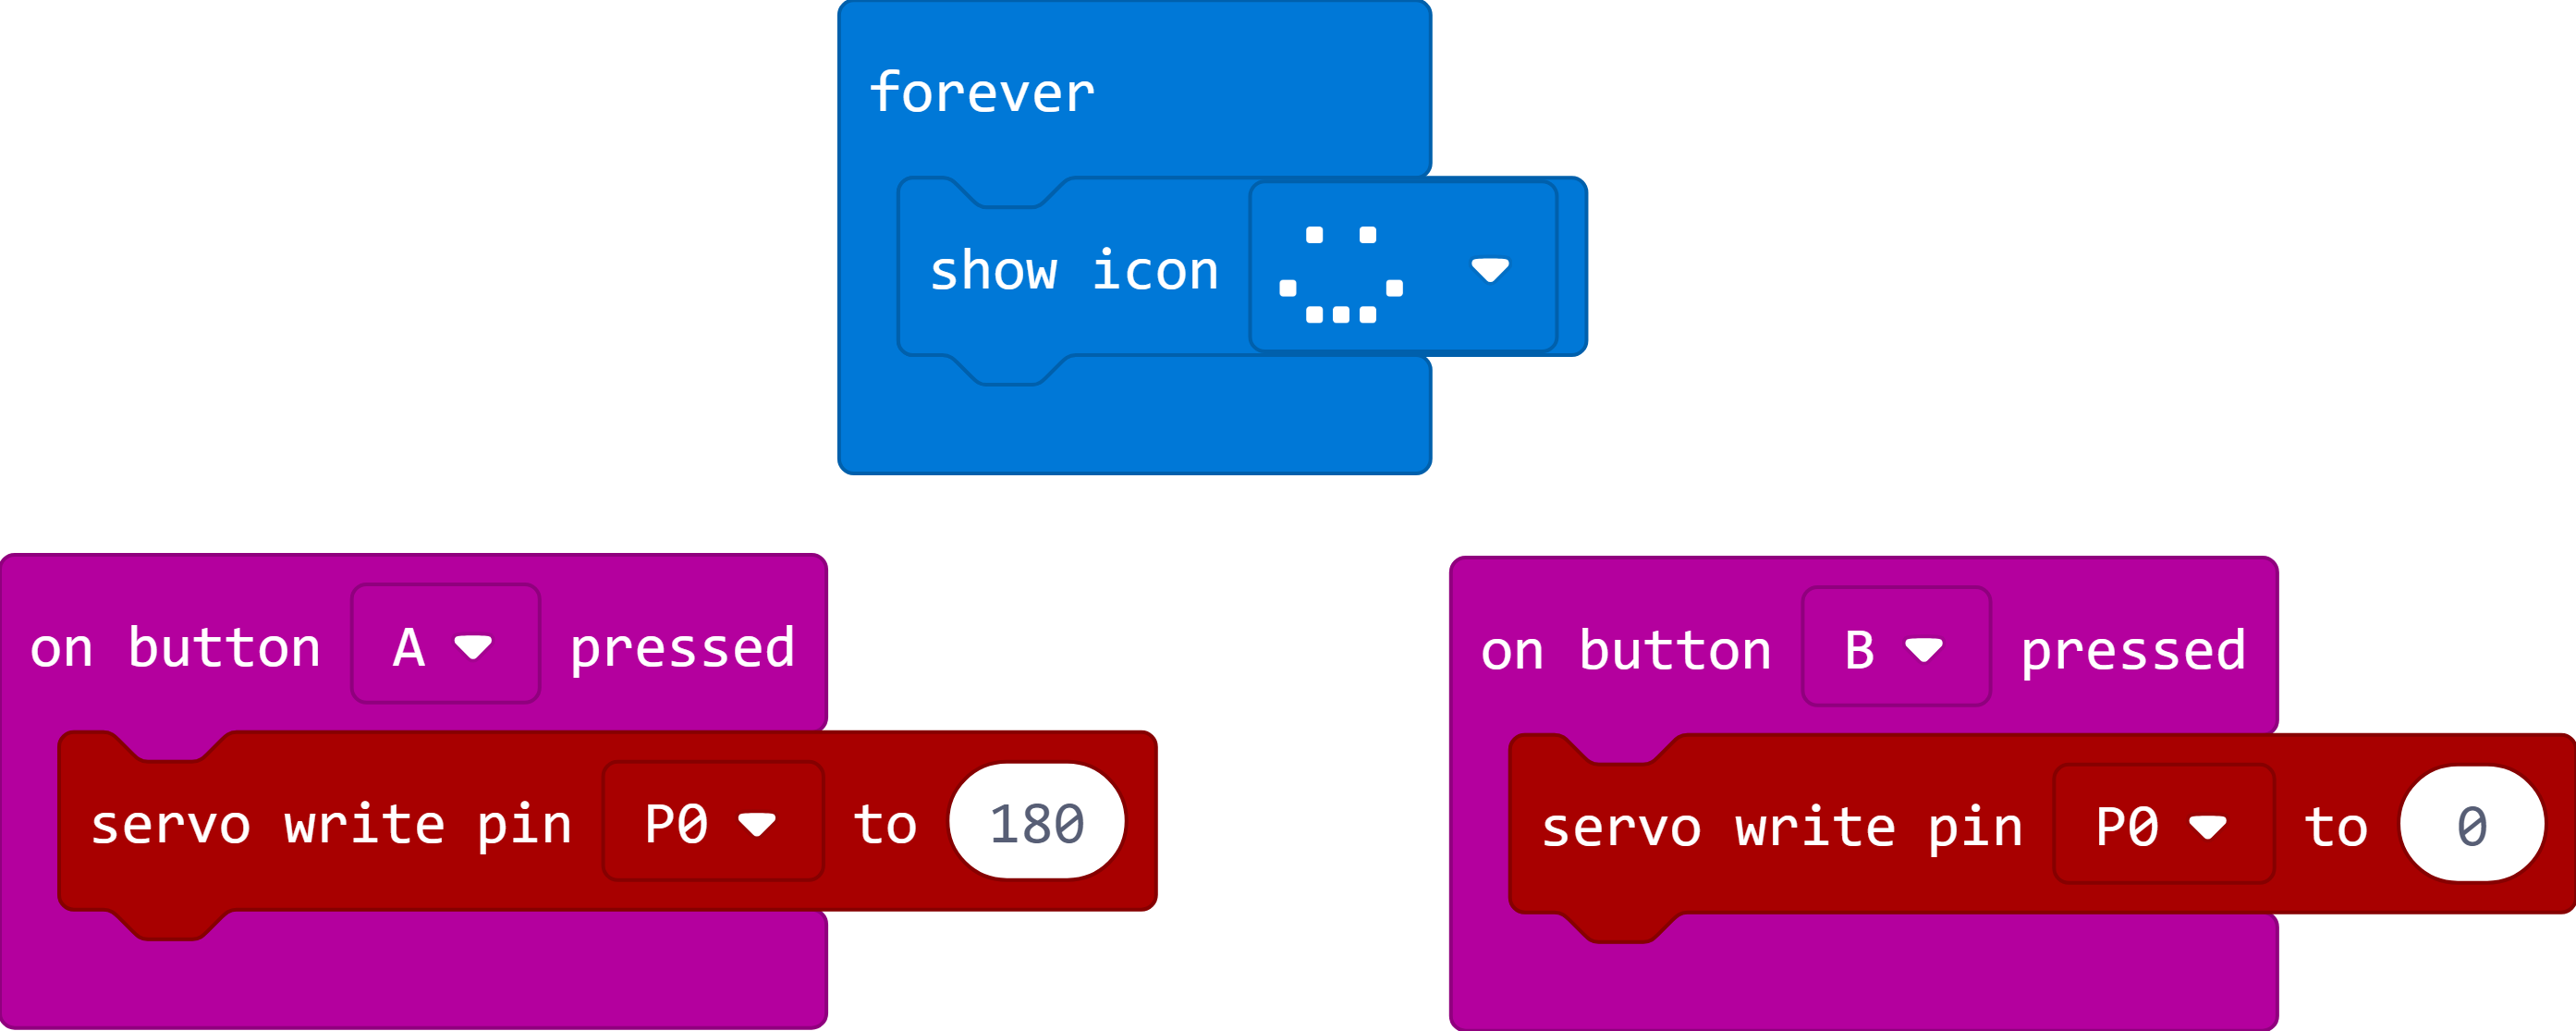
Figure 5 – Example program using a servo motor.
Week 2: Fortune Teller
Week 2: Fortune Teller

This project generated hours of fun for my kids! They spent the next few days consulting their Fortune Teller machines – “What should I do today?” “Will I get ice cream for dessert?” “What game should my brother play next?” “Do I have to go to bed now?”
Fortune Teller is a fun, easy project you can do with your kids using the Circuit Playground Express and some simple crafting materials.
Microsoft Research Podcast
AI Frontiers: Models and Systems with Ece Kamar
Ece Kamar explores short-term mitigation techniques to make these models viable components of the AI systems that give them purpose and shares the long-term research questions that will help maximize their value.
For this project, you’ll need:
- A computer with internet connection and a USB port
- A Circuit Playground Express Base Kit (see https://www.adafruit.com/product/3517 (opens in new tab)) that includes the Circuit Playground Express board, a USB cable, batteries and a battery pack
- Paper – slightly thicker cardstock paper works better
- Scissors
- Tape
- Colored Markers and/or Pencils or Pens
- Stickers or anything else you want to use to decorate your Fortune Telling Machine
Step 1: Envision your Fortune Telling Machine
Will it give simple Yes/No/Maybe answers? Will it be a random number generator? Or will it give specialized responses – like types of games to play, ice cream flavors, or books to read? Use your imagination to come up with a unique Fortune Telling Machine!
Step 2: Make your Fortune Telling Machine
Watch the video.
- Position the Circuit Playground Express in the center of a piece of paper
- Trace the outline of the board and put tick marks around the board to mark segments for the 10 lights. If you want, you can also use fewer than 10 options for your Fortune Teller.

Figure 2 – Fitting your lights.
- Draw the segments on your paper using a ruler or straight-edge.
- Write the different answers or options for your Fortune Teller in each segment.
- Cut out the shape of your fortune telling machine (round, triangle, square).
- Using a loop of tape, or double-sided tape, stick your Circuit Playground Express board to the paper.
- Poke a hole in the paper next to the battery port on the Circuit Playground Express.
- Thread the wire from the battery pack through the hole and attach to the Circuit Playground Express.
- Tape the battery pack onto the back of the paper.
- Decorate your Fortune Telling Machine!
Step 3: Code the Circuit Playground Express
If you have a Windows 10 computer, you can download and install the MakeCode for Adafruit app at http://aka.ms/adafruitapp (opens in new tab). Or just go to https://makecode.adafruit.com/ (opens in new tab).

Figure 3 – Coding the Circle Playground Express.
Watch how to write the code.
Optional Step:
To add a bit more complexity to your code, you can change the color that is displayed depending on the position of the light on the board. For example, if the random number lands in the “Yes” segment, show the light as green; if the random number lands in the “No” segment, show the light as red. And if the random number lands in the “Maybe” segment, show the light as purple.

Figure 4 – Extending your code.
Week 3: Minecraft Obstacle Course
Week 3: Minecraft Obstacle Course
My kids absolutely love playing Minecraft! And when I have time, I love playing with them too. Incorporating coding activities with Minecraft is tons of fun – after all, who doesn’t love spawning hordes of sheep!
Here’s another fun summer project you can do with your kids using MakeCode for Minecraft to create an Obstacle Course in Minecraft that you can challenge other Players to go through.

Figure 1 – Minecraft Obstacle Course volunteers at the ready!
MICROSOFT RESEARCH PODCAST

AI Frontiers: The future of scale with Ahmed Awadallah and Ashley Llorens
This episode features Senior Principal Research Manager Ahmed H. Awadallah, whose work improving the efficiency of large-scale AI models and efforts to help move advancements in the space from research to practice have put him at the forefront of this new era of AI.
To learn more, watch the introductory video:
For this project, you’ll need:
- A Windows 10 computer with an Internet connection.
- The Setup instructions available at: https://minecraft.makecode.com/setup (opens in new tab). You’ll want to download and install:
- Minecraft for Windows 10, or Minecraft: Education Edition
- Code Connection
Step 1: Plan your Obstacle Course
The first thing you’ll want to do is think about what kind of obstacle course you want to create. What will each of the different challenges be? What do you need to build in the world for each challenge? Think about using the different options in the On Player action block – walking, flying, swimming, climbing, and so on. You can even work with your kids to map out their obstacle courses on paper before diving into the game.
Step 2: Code your Obstacle Course
Be creative in building your obstacle courses! Glean some ideas from the obstacle courses we created by looking at our code:
- Sage Obstacle Course – https://makecode.com/_U9W3UXWYYJ2s (opens in new tab)
- Cyan Obstacle Course – https://makecode.com/_WgCKLFEWcDkT (opens in new tab)
- Jacqueline Obstacle Course – https://makecode.com/_8qvCHUhsMMy8 (opens in new tab)
Learn how to do it on your own. Check out our very kid-friendly coding video:
Step 3: Play!
Challenge your friends and family to get through your obstacle course. You can even use stop watch to see who can get through the fastest!

For other fun Minecraft projects to do with your kids see:
- MakeCode project examples available at https://minecraft.makecode.com/examples (opens in new tab)
- Minecraft build challenges available at http://aka.ms/meechallenges (opens in new tab)
And be sure to check out our other MakeCode Summer 2018 projects.
Week 4: LEGO MINDSTORMS City
Week 4: LEGO MINDSTORMS City
For this summer project, my kids created a little LEGO city with superheroes and bad guys. We used the LEGO MINDSTORMS EV3 robot as the bad guy who comes in to destroy the city! We built the driving base and attached the color sensor that the robot uses to stop and start – much like a red/green traffic light.

Defend our city, we will! Don’t miss the Introduction video available here.
Spotlight: Event Series

Microsoft Research Forum
Join us for a continuous exchange of ideas about research in the era of general AI. Watch Episodes 1 & 2 on-demand.
For this project, you’ll need:
- To purchase the LEGO MINDSTORMS EV3 kit, either online (opens in new tab) or from a LEGO retailer
- To update the EV3 brick firmware (instructions (opens in new tab))
- To build the driving base (instructions (opens in new tab))
- To attach the color sensor (instructions (opens in new tab))
- Some white paper
- Colored markers
- LEGO bricks
- Colored index cards
Step 1: Build your LEGO city
- Use a large piece of white paper (or several pieces) and tape it down to a table top.
- Use colored markers to create roads, lakes and parks in your city.
- Use LEGO bricks to create houses, cars, people and superheroes to protect your city,
- We used colored cards to activate the Red light and Green light on our MINDSTORMS robot, but you can also use the colored parts on paper to trigger the color sensor.
Step 2: Code the Red Light/Green Light program
Here’s the code example of the Red Light Green Light program for the MINDSTORMS EV3 :

Coding your Red Light/Green Light program. Don’t miss the coding video available here.
You can also try the Line Following (opens in new tab) program to make your MINDSTORMS robot follow the roads in your LEGO City, or use the Ultrasonic sensor to detect objects (opens in new tab).
Have fun with this exciting Make Code project!
Week 5: Cue the Messenger
Week 5: Cue the Messenger
Cue the Cleverbot is a very cute robot with a quirky attitude who your kids will absolutely love playing with! In this project, we’re going to be programming Cue to act as a messenger.Cue has lights, motors, buttons, sensors and a microphone and speaker that you can program.

Figure 1 – Cue the Cleverbot.
One of the great features of Cue that my kids discovered and had a blast with is its ability to record and play back audio files. We’ll be using this feature to send messages back and forth between the kids.
Spotlight: On-demand video

AI Explainer: Foundation models and the next era of AI
Explore how the transformer architecture, larger models and more data, and in-context learning have helped advance AI from perception to creation.
For this project, you’ll need:
- A Cue the Cleverbot robot. You can purchase it online from Wonder Workshop (opens in new tab).
- A Cue-compatible device (this could be a phone, tablet or computer.) For more details on which device models are supported, see the Will my device work (opens in new tab) page at Wonder Workshop.
- The Cue app (opens in new tab). You can download it for free from the Microsoft Store, Google Play or the Apple Store.

Figure 2 – Cue the young robotics engineers!
Don’t miss the Cue the Messenger Project Intro Video here.
Step 1: What messages do you want Cue to send?
The first thing you’ll want to do is think about what kind of message you want Cue to send. It could be a command, a secret, a funny joke or even a question and answer. In our case, we wanted to use Cue to ask what kind of drink Sage wanted – Apple Juice, or Chocolate Milk.
Step 2: Map out the path between the Sender and the Receiver
This is the physical path that Cue will travel to deliver messages back and forth. I recommend using pen and paper to draw this out before jumping into the code. Cue uses centimeters as the unit of measure for travelling distances.

Figure 3 – This is the kind of map making devotion Cue really appreciates.
Step 3: Code Cue!
- Open the Cue app on your device and connect to your Cue robot by clicking on the blue Plus icon in the top right corner of the app. Make sure Cue is powered on to enable the Bluetooth connection.

- Select the Code part of the app to get into the coding experience.
- Click on My Programs and then click Create a New Program.
- Depending on the path you want Cue to travel and the message you want to send, construct your program by dragging and dropping blocks of code into the workspace.
- To run your program, click on the orange Run button in the bottom right corner. You will most likely have to test and make adjustments to refine your program.

Your programming environment may look something like what is shown in Figure 4.

Figure 4 – Programming environment.
Figure 5 shows the code for our Cue Messenger program. The blocks we used were all in the Actions and Events categories.

Figure 5 – Our code.
Note: To record a message, use the Custom Sound block and press the Record button.

Figure 5 – Our code.
Our program’s custom sounds were as follows:
- Custom Sound 2 = “What drink would you like? Press the Circle button for Apple Juice or press the Square button for Chocolate Milk.”
- Custom Sound 3 = “Apple Juice.”
- Custom Sound 4 = “Chocolate Milk.”
Hope you enjoy this MakeCode Summer project as much as we did!
Week 6: Chibitronics birthday card
Week 6: Chibitronics birthday card
For our final MakeCode project this summer, we will be making an electronic birthday card for our friend using the Love To Code Kit from Chibitronics (opens in new tab). This is a great way to add a little more sparkle to any home-made greeting card, paper craft, art work or scrapbook.

Figure 1 – Making your birthday card.
Don’t miss the video here.
MICROSOFT RESEARCH PODCAST
AI Frontiers: The future of scale with Ahmed Awadallah and Ashley Llorens
This episode features Senior Principal Research Manager Ahmed H. Awadallah, whose work improving the efficiency of large-scale AI models and efforts to help move advancements in the space from research to practice have put him at the forefront of this new era of AI.
For this project, you’ll need:
- The Chibitronics Love to Code Kit (opens in new tab). The kit includes everything you need, plus the amazing Love to Code book with the MakeCode pages. Otherwise, you can purchase each of the following items individually:
- Paper. I used high quality sketch book drawing paper.
- Colored pencils, pens or crayons.
- Double-sided tape, or just regular tape folded over in a loop.
- A computer with internet access.
Step 1: Prepare the Card
- Fold your sheet of paper in half and decide how you want to orient your card (right-to-left opening, or bottom-to-top opening).
- Think about the picture you want on the front of the card – will it be balloons, a birthday cake, trees and flowers, or a message?
- You don’t need to draw the details at this stage, just sketch out the general areas of your picture and where you think you want the lights to show up.
Step 2: Attach the Chibi Chip to the inside of the card
- Using a bit of tape, securely attach the back of the Chibi Chip to the inside of your card so it won’t move around. Keep in mind, the USB cable will be connected to the board too.

Figure 2 – The Love to Code board
Step 3 : Design and layout your circuits
- This is the tricky part! I recommend using a pencil to map this out first.
- For each light that you want to place, you will need to connect one end of the light to Ground (GND), and the other end of the light to a Pin, 0-5.

Figure 3 – Connecting your LEDs
- This means that your LED light sticker will need to straddle between a strip of copper tape connected to Ground, and a strip of copper tape connected to a pin.

Figure 4 – Basic wiring diagram.
- Using a Pencil, draw out the different circuits to connect to the Chibi Chip and where to place each light.
- Then peel off the backing of the copper tape and lay it down along your pencil marks.
- Fold the tape at the turns to keep one contiguous piece
- Make sure the end of the copper tape connects with the Pins on the Chibi Chip. You can use the fabric patches to ensure a good connection.
Step 4: Place your LED light stickers
- Press down hard on the metal ends of the sticker to make sure they are securely connected to the copper tape.
- You can place multiple lights along the same circuit if you wish!
Step 5: Finalize your drawing
- Using the red USB cable, connect the Chibi Chip to a power source to make the lights turn on.
- Fold over your card to see the front and where the lights shine through.
- Make a mark for each of your lights.
- Then complete the drawing around where the lights will be.

Figure 5 – Hey … this is going to look really cool!
Step 6: Now code an animation for your lights!
- Open a browser window to https://makecode.chibitronics.com (opens in new tab).
- You’ll see some tutorials and code samples you can use or start a new blank project.
- The following is an example program that uses some different light effects across pins 0-3.

Figure 6 – Sample program using different light effects across pins 0-3.
Don’t miss the coding video here.
For more Chibitronics how-to guides and tips, visit the Chibitronics website (opens in new tab).
Hope you liked this project! Thanks for joining us for this and our other MakeCode Summer 2018 projects.
Week 1: Micro:Pet
Week 1: Micro:Pet
If your kids are like mine, they’ll spend a few minutes playing with their fancy toys, and a few hours playing with good old-fashioned cardboard boxes, string and markers in the garage!
Micro:Pet is a fun project that gets your kids’ creativity flowing using materials you can find around the house while incorporating electronics and coding concepts and activities with the micro:bit.
For the Micro:Pet project, you’ll need:
- A computer with internet connection and USB port
- A micro:bit Go Kit (available at Microcenter.com (opens in new tab)) that includes a micro:bit, a USB cable, a battery pack and batteries
- Small cardboard boxes, toilet paper rolls, paper cups/bowls or anything you have around the house to construct your pet with
- Markers, pipe cleaners, googly eyes, colored paper, feathers and anything else you have on hand to decorate your pet!
Microsoft Research Podcast
AI Frontiers: Models and Systems with Ece Kamar
Ece Kamar explores short-term mitigation techniques to make these models viable components of the AI systems that give them purpose and shares the long-term research questions that will help maximize their value.
Check out our fun video about our micro:pets!
Step 1: What’s your dream pet?
The first thing you’ll want to do is think about what kind of pet you want to create. It could be something you’ve always wanted to have as a pet, but couldn’t – say a unicorn, a dragon or a skunk.
Step 2: Make your pet
Using the materials at hand, create your dream Pet. Remember to include enough space in your design to attach your micro:bit and the battery pack.
Step 3: Code the micro:bit
If you have a Windows 10 computer, you can download and install the micro:bit app at http://aka.ms/microbitapp (opens in new tab). Otherwise, go to https://makecode.microbit.org/ (opens in new tab).
You can use your micro:bit in many different ways on your pet. Here is an example of a program for your Micro:Pet, but be creative and come up with your own unique project!
Figure 1 – An example of a Micro:Pet program. Don’t miss the video at https://youtu.be/Sd_hB4nyUXI (opens in new tab)
Optional steps:
1. Adding audio
You can add audio and play sounds through your micro:bit by connecting it to headphones, earbuds or an external speaker. Note: there is only one volume level at which the micro:bit plays – and it is very loud! Don’t put earbuds in your ear when you run your program. In addition to the micro:bit, you will need:
- Headphones, earbuds, or a speaker with an audio jack
- alligator/crocodile clips (for example, see https://www.amazon.com/WGGE-WG-026-Pieces-Colors-Alligator/dp/B06XX25HFX/ (opens in new tab))or
- A headphone adapter (see http://microbit-accessories.co.uk/shop/music/headphone-adapter/ (opens in new tab))
Figure 2 – What you’ll need for sound. Don’t miss the video at https://youtu.be/Wx73kbW5s9E (opens in new tab)
Figure 3 – Example program using sounds.
2. Adding motion
You can add motion to your Micro:Pet – for example, wagging its tail when your pet is fed. To do this, you will need to attach a servo motor to your micro:bit. You will need:
- A 180-degree servo motor (see https://www.amazon.com/J-Deal-Micro-Helicopter-Airplane-Controls/dp/B015H5AVZG/ (opens in new tab))
- 3 alligator-to-male connector cables (see https://www.amazon.com/Alligator-Clip-Pigtail-10-Pack/dp/B07C6YHB9S/ (opens in new tab))
Figure 4 – What you’ll need to put your pet in motion. Don’t miss the video at https://youtu.be/qdX86in2YXo (opens in new tab)
Figure 5 – Example program using a servo motor.
Week 2: Fortune Teller
Week 2: Fortune Teller
This project generated hours of fun for my kids! They spent the next few days consulting their Fortune Teller machines – “What should I do today?” “Will I get ice cream for dessert?” “What game should my brother play next?” “Do I have to go to bed now?”
Fortune Teller is a fun, easy project you can do with your kids using the Circuit Playground Express and some simple crafting materials.
Microsoft Research Podcast
AI Frontiers: Models and Systems with Ece Kamar
Ece Kamar explores short-term mitigation techniques to make these models viable components of the AI systems that give them purpose and shares the long-term research questions that will help maximize their value.
For this project, you’ll need:
- A computer with internet connection and a USB port
- A Circuit Playground Express Base Kit (see https://www.adafruit.com/product/3517 (opens in new tab)) that includes the Circuit Playground Express board, a USB cable, batteries and a battery pack
- Paper – slightly thicker cardstock paper works better
- Scissors
- Tape
- Colored Markers and/or Pencils or Pens
- Stickers or anything else you want to use to decorate your Fortune Telling Machine
Step 1: Envision your Fortune Telling Machine
Will it give simple Yes/No/Maybe answers? Will it be a random number generator? Or will it give specialized responses – like types of games to play, ice cream flavors, or books to read? Use your imagination to come up with a unique Fortune Telling Machine!
Step 2: Make your Fortune Telling Machine
Watch the video.
- Position the Circuit Playground Express in the center of a piece of paper
- Trace the outline of the board and put tick marks around the board to mark segments for the 10 lights. If you want, you can also use fewer than 10 options for your Fortune Teller.
Figure 2 – Fitting your lights.
- Draw the segments on your paper using a ruler or straight-edge.
- Write the different answers or options for your Fortune Teller in each segment.
- Cut out the shape of your fortune telling machine (round, triangle, square).
- Using a loop of tape, or double-sided tape, stick your Circuit Playground Express board to the paper.
- Poke a hole in the paper next to the battery port on the Circuit Playground Express.
- Thread the wire from the battery pack through the hole and attach to the Circuit Playground Express.
- Tape the battery pack onto the back of the paper.
- Decorate your Fortune Telling Machine!
Step 3: Code the Circuit Playground Express
If you have a Windows 10 computer, you can download and install the MakeCode for Adafruit app at http://aka.ms/adafruitapp (opens in new tab). Or just go to https://makecode.adafruit.com/ (opens in new tab).
Figure 3 – Coding the Circle Playground Express.
Watch how to write the code.
Optional Step:
To add a bit more complexity to your code, you can change the color that is displayed depending on the position of the light on the board. For example, if the random number lands in the “Yes” segment, show the light as green; if the random number lands in the “No” segment, show the light as red. And if the random number lands in the “Maybe” segment, show the light as purple.
Figure 4 – Extending your code.
Week 3: Minecraft Obstacle Course
Week 3: Minecraft Obstacle Course
My kids absolutely love playing Minecraft! And when I have time, I love playing with them too. Incorporating coding activities with Minecraft is tons of fun – after all, who doesn’t love spawning hordes of sheep!
Here’s another fun summer project you can do with your kids using MakeCode for Minecraft to create an Obstacle Course in Minecraft that you can challenge other Players to go through.
Figure 1 – Minecraft Obstacle Course volunteers at the ready!
MICROSOFT RESEARCH PODCAST
AI Frontiers: The future of scale with Ahmed Awadallah and Ashley Llorens
This episode features Senior Principal Research Manager Ahmed H. Awadallah, whose work improving the efficiency of large-scale AI models and efforts to help move advancements in the space from research to practice have put him at the forefront of this new era of AI.
To learn more, watch the introductory video:
For this project, you’ll need:
- A Windows 10 computer with an Internet connection.
- The Setup instructions available at: https://minecraft.makecode.com/setup (opens in new tab). You’ll want to download and install:
- Minecraft for Windows 10, or Minecraft: Education Edition
- Code Connection
Step 1: Plan your Obstacle Course
The first thing you’ll want to do is think about what kind of obstacle course you want to create. What will each of the different challenges be? What do you need to build in the world for each challenge? Think about using the different options in the On Player action block – walking, flying, swimming, climbing, and so on. You can even work with your kids to map out their obstacle courses on paper before diving into the game.
Step 2: Code your Obstacle Course
Be creative in building your obstacle courses! Glean some ideas from the obstacle courses we created by looking at our code:
- Sage Obstacle Course – https://makecode.com/_U9W3UXWYYJ2s (opens in new tab)
- Cyan Obstacle Course – https://makecode.com/_WgCKLFEWcDkT (opens in new tab)
- Jacqueline Obstacle Course – https://makecode.com/_8qvCHUhsMMy8 (opens in new tab)
Learn how to do it on your own. Check out our very kid-friendly coding video:
Step 3: Play!
Challenge your friends and family to get through your obstacle course. You can even use stop watch to see who can get through the fastest!
For other fun Minecraft projects to do with your kids see:
- MakeCode project examples available at https://minecraft.makecode.com/examples (opens in new tab)
- Minecraft build challenges available at http://aka.ms/meechallenges (opens in new tab)
And be sure to check out our other MakeCode Summer 2018 projects.
Week 4: LEGO MINDSTORMS City
Week 4: LEGO MINDSTORMS City
For this summer project, my kids created a little LEGO city with superheroes and bad guys. We used the LEGO MINDSTORMS EV3 robot as the bad guy who comes in to destroy the city! We built the driving base and attached the color sensor that the robot uses to stop and start – much like a red/green traffic light.
Defend our city, we will! Don’t miss the Introduction video available here.
Spotlight: Event Series
Microsoft Research Forum
Join us for a continuous exchange of ideas about research in the era of general AI. Watch Episodes 1 & 2 on-demand.
For this project, you’ll need:
- To purchase the LEGO MINDSTORMS EV3 kit, either online (opens in new tab) or from a LEGO retailer
- To update the EV3 brick firmware (instructions (opens in new tab))
- To build the driving base (instructions (opens in new tab))
- To attach the color sensor (instructions (opens in new tab))
- Some white paper
- Colored markers
- LEGO bricks
- Colored index cards
Step 1: Build your LEGO city
- Use a large piece of white paper (or several pieces) and tape it down to a table top.
- Use colored markers to create roads, lakes and parks in your city.
- Use LEGO bricks to create houses, cars, people and superheroes to protect your city,
- We used colored cards to activate the Red light and Green light on our MINDSTORMS robot, but you can also use the colored parts on paper to trigger the color sensor.
Step 2: Code the Red Light/Green Light program
Here’s the code example of the Red Light Green Light program for the MINDSTORMS EV3 :
Coding your Red Light/Green Light program. Don’t miss the coding video available here.
You can also try the Line Following (opens in new tab) program to make your MINDSTORMS robot follow the roads in your LEGO City, or use the Ultrasonic sensor to detect objects (opens in new tab).
Have fun with this exciting Make Code project!
Week 5: Cue the Messenger
Week 5: Cue the Messenger
Cue the Cleverbot is a very cute robot with a quirky attitude who your kids will absolutely love playing with! In this project, we’re going to be programming Cue to act as a messenger.Cue has lights, motors, buttons, sensors and a microphone and speaker that you can program.
Figure 1 – Cue the Cleverbot.
One of the great features of Cue that my kids discovered and had a blast with is its ability to record and play back audio files. We’ll be using this feature to send messages back and forth between the kids.
Spotlight: On-demand video
AI Explainer: Foundation models and the next era of AI
Explore how the transformer architecture, larger models and more data, and in-context learning have helped advance AI from perception to creation.
For this project, you’ll need:
- A Cue the Cleverbot robot. You can purchase it online from Wonder Workshop (opens in new tab).
- A Cue-compatible device (this could be a phone, tablet or computer.) For more details on which device models are supported, see the Will my device work (opens in new tab) page at Wonder Workshop.
- The Cue app (opens in new tab). You can download it for free from the Microsoft Store, Google Play or the Apple Store.
Figure 2 – Cue the young robotics engineers!
Don’t miss the Cue the Messenger Project Intro Video here.
Step 1: What messages do you want Cue to send?
The first thing you’ll want to do is think about what kind of message you want Cue to send. It could be a command, a secret, a funny joke or even a question and answer. In our case, we wanted to use Cue to ask what kind of drink Sage wanted – Apple Juice, or Chocolate Milk.
Step 2: Map out the path between the Sender and the Receiver
This is the physical path that Cue will travel to deliver messages back and forth. I recommend using pen and paper to draw this out before jumping into the code. Cue uses centimeters as the unit of measure for travelling distances.
Figure 3 – This is the kind of map making devotion Cue really appreciates.
Step 3: Code Cue!
- Open the Cue app on your device and connect to your Cue robot by clicking on the blue Plus icon in the top right corner of the app. Make sure Cue is powered on to enable the Bluetooth connection.
- Select the Code part of the app to get into the coding experience.
- Click on My Programs and then click Create a New Program.
- Depending on the path you want Cue to travel and the message you want to send, construct your program by dragging and dropping blocks of code into the workspace.
- To run your program, click on the orange Run button in the bottom right corner. You will most likely have to test and make adjustments to refine your program.
Your programming environment may look something like what is shown in Figure 4.
Figure 4 – Programming environment.
Figure 5 shows the code for our Cue Messenger program. The blocks we used were all in the Actions and Events categories.
Figure 5 – Our code.
Note: To record a message, use the Custom Sound block and press the Record button.
Figure 5 – Our code.
Our program’s custom sounds were as follows:
- Custom Sound 2 = “What drink would you like? Press the Circle button for Apple Juice or press the Square button for Chocolate Milk.”
- Custom Sound 3 = “Apple Juice.”
- Custom Sound 4 = “Chocolate Milk.”
Hope you enjoy this MakeCode Summer project as much as we did!
Week 6: Chibitronics birthday card
Week 6: Chibitronics birthday card
For our final MakeCode project this summer, we will be making an electronic birthday card for our friend using the Love To Code Kit from Chibitronics (opens in new tab). This is a great way to add a little more sparkle to any home-made greeting card, paper craft, art work or scrapbook.
Figure 1 – Making your birthday card.
Don’t miss the video here.
MICROSOFT RESEARCH PODCAST
AI Frontiers: The future of scale with Ahmed Awadallah and Ashley Llorens
This episode features Senior Principal Research Manager Ahmed H. Awadallah, whose work improving the efficiency of large-scale AI models and efforts to help move advancements in the space from research to practice have put him at the forefront of this new era of AI.
For this project, you’ll need:
- The Chibitronics Love to Code Kit (opens in new tab). The kit includes everything you need, plus the amazing Love to Code book with the MakeCode pages. Otherwise, you can purchase each of the following items individually:
- Paper. I used high quality sketch book drawing paper.
- Colored pencils, pens or crayons.
- Double-sided tape, or just regular tape folded over in a loop.
- A computer with internet access.
Step 1: Prepare the Card
- Fold your sheet of paper in half and decide how you want to orient your card (right-to-left opening, or bottom-to-top opening).
- Think about the picture you want on the front of the card – will it be balloons, a birthday cake, trees and flowers, or a message?
- You don’t need to draw the details at this stage, just sketch out the general areas of your picture and where you think you want the lights to show up.
Step 2: Attach the Chibi Chip to the inside of the card
- Using a bit of tape, securely attach the back of the Chibi Chip to the inside of your card so it won’t move around. Keep in mind, the USB cable will be connected to the board too.
Figure 2 – The Love to Code board
Step 3 : Design and layout your circuits
- This is the tricky part! I recommend using a pencil to map this out first.
- For each light that you want to place, you will need to connect one end of the light to Ground (GND), and the other end of the light to a Pin, 0-5.
Figure 3 – Connecting your LEDs
- This means that your LED light sticker will need to straddle between a strip of copper tape connected to Ground, and a strip of copper tape connected to a pin.
Figure 4 – Basic wiring diagram.
- Using a Pencil, draw out the different circuits to connect to the Chibi Chip and where to place each light.
- Then peel off the backing of the copper tape and lay it down along your pencil marks.
- Fold the tape at the turns to keep one contiguous piece
- Make sure the end of the copper tape connects with the Pins on the Chibi Chip. You can use the fabric patches to ensure a good connection.
Step 4: Place your LED light stickers
- Press down hard on the metal ends of the sticker to make sure they are securely connected to the copper tape.
- You can place multiple lights along the same circuit if you wish!
Step 5: Finalize your drawing
- Using the red USB cable, connect the Chibi Chip to a power source to make the lights turn on.
- Fold over your card to see the front and where the lights shine through.
- Make a mark for each of your lights.
- Then complete the drawing around where the lights will be.
Figure 5 – Hey … this is going to look really cool!
Step 6: Now code an animation for your lights!
- Open a browser window to https://makecode.chibitronics.com (opens in new tab).
- You’ll see some tutorials and code samples you can use or start a new blank project.
- The following is an example program that uses some different light effects across pins 0-3.
Figure 6 – Sample program using different light effects across pins 0-3.
Don’t miss the coding video here.
For more Chibitronics how-to guides and tips, visit the Chibitronics website (opens in new tab).
Hope you liked this project! Thanks for joining us for this and our other MakeCode Summer 2018 projects.