A Sublime Text 3 extension for ASP.NET vNext
In this readme you will learn how to install the components to get started with ASP.NET in Sublime Text 3. There is also a getting started tutorial to show you some of the features included with this release.
-
Install ASP.NET vNext Command Line Tools
-
Download Sublime Text 3
-
Install Sublime Kulture Using the Package Control Plugin
- Follow these instructions to install package control
- Bring up the Command Palette (Cmd + Shift + P on OS X, Ctrl + Shift + P on Windows).
- Select
Package Control: Install Package - Select
Kulturewhen the list appears. - Package Control will automatically keep Kulture up to date with the latest version.
Manual Install
- Install Sublime Kulture by cloning this repo into
/Users/{user}/Library/Application\ Support/Sublime\ Text\ 3/Packagesgit clone https://github.com/OmniSharp/Kulture.git
- Install ASP.NET vNext Command Line Tools
- Perpare Powershell execution policy. In an Admin PowerShell window execute the following command.
Set-ExecutionPolicy RemoteSigned- From an admin command prompt window run the following command
powershell -NoProfile -ExecutionPolicy unrestricted -Command "iex ((new-object net.webclient).DownloadString('https://raw.githubusercontent.com/aspnet/Home/master/kvminstall.ps1'))"- Close the command prompt window and open a new command prompt window and run the following commands
kvm upgrade- If Sublime was already installed and running while installing ASP.NET vNext Command Line Tools, you will need to restart Sublime for the changes to work.
-
Download and Install Sublime Text 3
-
Install Sublime Kulture
Using the Package Control Plugin
- Follow these instructions to install package control
- Bring up the Command Palette (Cmd + Shift + P on OS X, Ctrl + Shift + P on Windows).
- Select
Package Control: Install Package - Select
Kulturewhen the list appears. - Package Control will automatically keep Schema Validator up to date with the latest version.
Manual Install
- Install Sublime vNext by cloning this repo into
C:\Users\{user}\AppData\Roaming\Sublime Text 3\Packagesgit clone https://github.com/OmniSharp/Kulture.git
Note: The Sublime Text 3 directory may not exist if you have never launched Sublime before. If you are unable to locate this directory try launching Sublime and try again
#Getting Started
This tutorial will show you how you can get started with ASP.NET vNext in Sublime Text 3. After completing this tutorial you will be familiar with how to use Sublime Kulture and its primary features.
To get started you can use yeoman
Note: This requires you to have node.js and npm already installed
npm install -g yo
npm install -g generator-aspnet
To run the yeoman scaffolder, type
yo aspnet
Let's go ahead and create a new Web project using yo aspnet. In Sublime, click on File -> Open Folder and navigate to the folder to open it up.
Note: In Sublime for Mac use the
File -> Opencommand
Since we just grabbed this from source control there are NuGet packages which this project requires that are missing. To restore the NuGet packages
- Press
Ctrl(Cmd) + Shift + Pto bring up the command palette - Type
Run K Commandsand hit Enter (Return) - Type
dnu restoreand hit Enter (Return)
Note: when executing dnu restore if you get an error about missing NuGet packages you can execute the alternate command dnu restore -s https://www.myget.org/F/aspnetvnext/api/v2
You should see a Terminal/Powershell window launch and execute your commands.
Now, let's go ahead and tell Sublime to use ASP.NET as the build system. To do this, click Tools -> Build System -> ASP.NET
- Press
Ctrl(Cmd) + BorF7to build projects
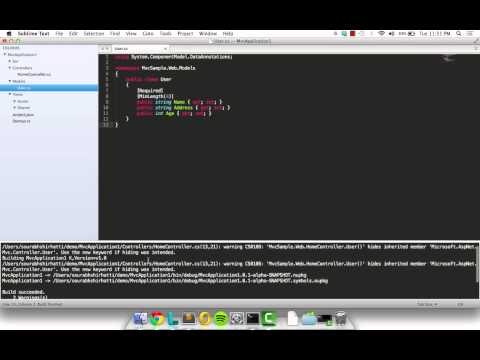
You should be able to see the output of your build in the output window towards the bottom of your screen. At this point your code should have built successfully.
Now let's see what the experience looks like if there is an error in your .cs file. Introduce an error in the Startup.cs file and try building again. You should now see errors in the output window. You can navigate through the errors as follows
F4takes you to the next errorShft + F4takes you to the previous error
When an error has focus it will be highlighted in the build results and your cursor will be taken to the line and column where the error was reported.
After we resolve all the errors we have introduced, let us try and run the application
- Press
Ctrl(Cmd) + Shift + Pto bring up the command palette - Type
Run K Commandsand hit Enter (Return) - Type
dnx weband hit Enter (Return) - If you are on a Mac or Linux, type
dnx kestreland hit Enter (Return)
You should see a Terminal/Powershell window launch and start running your server. You can navigate to http://localhost:5001 (or http://localhost:5000 on a Mac) in your favorite browser you view the website.
#Intellisense
To be able to get intellisense working within Sublime please install OmnisharpSublime (follow the instructions in the README).
To get intellisense with ASP.Net vNext projects you need to create a project file in Sublime. Go to Project - Save Project As and enter in a name for your project. OmniSharpSublime will use this to know what files and assemblies it needs to provide intellisense for (TIP : Close & Re-Open Sublime if you do not see intellisense, it may take 10 secs for the intellisense server OmniSharpServer to start once Sublime has loaded all the plugins)
Once OmniSharpSublime is installed and you have a project file you should be able to see intellisense:

All of Sublime Terminal is licensed under the MIT license.

  Copyright (c) 2011 Will Bond

  Permission is hereby granted, free of charge, to any person obtaining a copy
  of this software and associated documentation files (the "Software"), to deal
  in the Software without restriction, including without limitation the rights
  to use, copy, modify, merge, publish, distribute, sublicense, and/or sell
  copies of the Software, and to permit persons to whom the Software is
  furnished to do so, subject to the following conditions:

  The above copyright notice and this permission notice shall be included in
  all copies or substantial portions of the Software.

  THE SOFTWARE IS PROVIDED "AS IS", WITHOUT WARRANTY OF ANY KIND, EXPRESS OR
  IMPLIED, INCLUDING BUT NOT LIMITED TO THE WARRANTIES OF MERCHANTABILITY,
  FITNESS FOR A PARTICULAR PURPOSE AND NONINFRINGEMENT. IN NO EVENT SHALL THE
  AUTHORS OR COPYRIGHT HOLDERS BE LIABLE FOR ANY CLAIM, DAMAGES OR OTHER
  LIABILITY, WHETHER IN AN ACTION OF CONTRACT, TORT OR OTHERWISE, ARISING FROM,
  OUT OF OR IN CONNECTION WITH THE SOFTWARE OR THE USE OR OTHER DEALINGS IN
  THE SOFTWARE.