Use the Windows 10 Resource Management System in a legacy app or game
.NET and Win32 apps and games are often localized into different languages to expand their total addressable market. For more info about the value proposition of localizing your app, see Globalization and localization. By packaging your .NET or Win32 app or game as an .msix or .appx package, you can leverage the Resource Management System to load app resources tailored to the run-time context. This in-depth topic describes the techniques.
There are many ways to localize a traditional Win32 application, but Windows 8 introduced a new resource-management system that works across programming languages, across application types, and provides functionality over and above simple localization. This system will be referred to as "MRT" in this topic. Historically, that stood for "Modern Resource Technology" but the term "Modern" has been discontinued. The resource manager might also be known as MRM (Modern Resource Manager) or PRI (Package Resource Index).
Combined with MSIX-based or .appx-based deployment (for example, from the Microsoft Store), MRT can automatically deliver the most-applicable resources for a given user / device which minimizes the download and install size of your application. This size reduction can be significant for applications with a large amount of localized content, perhaps on the order of several gigabytes for AAA games. Additional benefits of MRT include localized listings in the Windows Shell and the Microsoft Store, automatic fallback logic when a user's preferred language doesn't match your available resources.
This document describes the high-level architecture of MRT and provides a porting guide to help move legacy Win32 applications to MRT with minimal code changes. Once the move to MRT is made, additional benefits (such as the ability to segment resources by scale factor or system theme) become available to the developer. Note that MRT-based localization works for both UWP applications and Win32 applications processed by the Desktop Bridge (aka "Centennial").
In many situations, you can continue to use your existing localization formats and source code whilst integrating with MRT for resolving resources at runtime and minimizing download sizes - it's not an all-or-nothing approach. The following table summarizes the work and estimated cost/benefit of each stage. This table doesn't include non-localization tasks, such as providing high-resolution or high-contrast application icons. For more info about providing multiple assets for tiles, icons, etc., See Tailor your resources for language, scale, high contrast, and other qualifiers.
| Work | Benefit | Estimated cost |
|---|---|---|
| Localize package manifest | Bare minimum work required to have your localized content appear in the Windows Shell and in the Microsoft Store | Small |
| Use MRT to identify and locate resources | Pre-requisite to minimizing download and install sizes; automatic language fallback | Medium |
| Build resource packs | Final step to minimize download and install sizes | Small |
| Migrate to MRT resource formats and APIs | Significantly smaller file sizes (depending on existing resource technology) | Large |
Introduction
Most non-trivial applications contain user-interface elements known as resources that are decoupled from the application's code (contrasted with hard-coded values that are authored in the source code itself). There are several reasons to prefer resources over hard-coded values - ease of editing by non-developers, for example - but one of the key reasons is to enable the application to pick different representations of the same logical resource at runtime. For example, the text to display on a button (or the image to display in an icon) might differ depending on the language(s) the user understands, the characteristics of the display device, or whether the user has any assistive technologies enabled.
Thus the primary purpose of any resource-management technology is to translate, at runtime, a request for a logical or symbolic resource name (such as SAVE_BUTTON_LABEL) into the best possible actual value (eg, "Save") from a set of possible candidates (eg, "Save", "Speichern", or "저장"). MRT provides such a function, and enables applications to identify resource candidates using a wide variety of attributes, called qualifiers, such as the user's language, the display scale-factor, the user's selected theme, and other environmental factors. MRT even supports custom qualifiers for applications that need it (for example, an application could provide different graphic assets for users that had logged in with an account vs. guest users, without explicitly adding this check into every part of their application). MRT works with both string resources and file-based resources, where file-based resources are implemented as references to the external data (the files themselves).
Example
Here's a simple example of an application that has text labels on two buttons (openButton and saveButton) and a PNG file used for a logo (logoImage). The text labels are localized into English and German, and the logo is optimized for normal desktop displays (100% scale factor) and high-resolution phones (300% scale factor). Note that this diagram presents a high-level, conceptual view of the model; it does not map exactly to implementation.
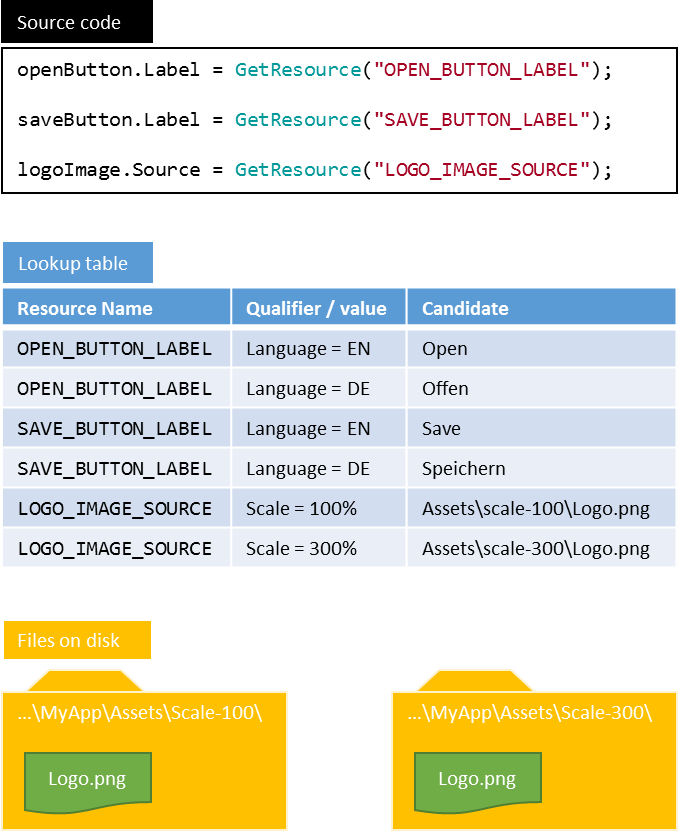
In the graphic, the application code references the three logical resource names. At runtime, the GetResource pseudo-function uses MRT to look those resource names up in the resource table (known as PRI file) and find the most appropriate candidate based on the ambient conditions (the user's language and the display's scale-factor). In the case of the labels, the strings are used directly. In the case of the logo image, the strings are interpreted as filenames and the files are read off disk.
If the user speaks a language other than English or German, or has a display scale-factor other than 100% or 300%, MRT picks the "closest" matching candidate based on a set of fallback rules (see Resource Management System for more background).
Note that MRT supports resources that are tailored to more than one qualifier - for example, if the logo image contained embedded text that also needed to be localized, the logo would have four candidates: EN/Scale-100, DE/Scale-100, EN/Scale-300 and DE/Scale-300.
Sections in this document
The following sections outline the high-level tasks required to integrate MRT with your application.
Phase 0: Build an application package
This section outlines how to get your existing Desktop application building as an application package. No MRT features are used at this stage.
Phase 1: Localize the application manifest
This section outlines how to localize your application's manifest (so that it appears correctly in the Windows Shell) whilst still using your legacy resource format and API to package and locate resources.
Phase 2: Use MRT to identify and locate resources
This section outlines how to modify your application code (and possibly resource layout) to locate resources using MRT, whilst still using your existing resource formats and APIs to load and consume the resources.
Phase 3: Build resource packs
This section outlines the final changes needed to separate your resources into separate resource packs, minimizing the download (and install) size of your app.
Not covered in this document
After completing Phases 0-3 above, you will have an application "bundle" that can be submitted to the Microsoft Store and that will minimize the download and install size for users by omitting the resources they don't need (eg, languages they don't speak). Further improvements in application size and functionality can be made by taking one final step.
Phase 4: Migrate to MRT resource formats and APIs
This phase is beyond the scope of this document; it entails moving your resources (particularly strings) from legacy formats such as MUI DLLs or .NET resource assemblies into PRI files. This can lead to further space savings for download & install sizes. It also allows use of other MRT features such as minimizing the download and install of image files by based on scale factor, accessibility settings, and so on.
Phase 0: Build an application package
Before you make any changes to your application's resources, you must first replace your current packaging and installation technology with the standard UWP packaging and deployment technology. There are three ways to do this:
- If you have a large desktop application with a complex installer or you utilize lots of OS extensibility points, you can use the Desktop App Converter tool to generate the UWP file layout and manifest information from your existing app installer (for example, an MSI).
- If you have a smaller desktop application with relatively few files or a simple installer and no extensibility hooks, you can create the file layout and manifest information manually.
- If you're rebuilding from source and want to update your app to be a pure UWP application, you can create a new project in Visual Studio and rely on the IDE to do much of the work for you.
If you want to use the Desktop App Converter, see Package a desktop application using the Desktop App Converter for more information on the conversion process. A complete set of Desktop Converter samples can be found on the Desktop Bridge to UWP samples GitHub repo.
If you want to manually create the package, you will need to create a directory structure that includes all your application's files (executables and content, but not source code) and a package manifest file (.appxmanifest). An example can be found in the Hello, World GitHub sample,
but a basic package manifest file that runs the desktop executable named ContosoDemo.exe is as follows, where the highlighted text would be replaced by your own values.
<?xml version="1.0" encoding="utf-8" ?>
<Package xmlns="http://schemas.microsoft.com/appx/manifest/foundation/windows10"
         xmlns:mp="http://schemas.microsoft.com/appx/2014/phone/manifest"
         xmlns:uap="http://schemas.microsoft.com/appx/manifest/uap/windows10"
         xmlns:rescap="http://schemas.microsoft.com/appx/manifest/foundation/windows10/restrictedcapabilities"
         IgnorableNamespaces="uap mp rescap">
    <Identity Name="Contoso.Demo"
              Publisher="CN=Contoso.Demo"
              Version="1.0.0.0" />
    <Properties>
    <DisplayName>Contoso App</DisplayName>
    <PublisherDisplayName>Contoso, Inc</PublisherDisplayName>
    <Logo>Assets\StoreLogo.png</Logo>
  </Properties>
    <Dependencies>
    <TargetDeviceFamily Name="Windows.Desktop" MinVersion="10.0.14393.0"
                        MaxVersionTested="10.0.14393.0" />
  </Dependencies>
    <Resources>
    <Resource Language="en-US" />
  </Resources>
    <Applications>
    <Application Id="ContosoDemo" Executable="ContosoDemo.exe"
                 EntryPoint="Windows.FullTrustApplication">
    <uap:VisualElements DisplayName="Contoso Demo" BackgroundColor="#777777"
                        Square150x150Logo="Assets\Square150x150Logo.png"
                        Square44x44Logo="Assets\Square44x44Logo.png"
        Description="Contoso Demo">
      </uap:VisualElements>
    </Application>
  </Applications>
    <Capabilities>
    <rescap:Capability Name="runFullTrust" />
  </Capabilities>
</Package>
For more information about the package manifest file and package layout, see App package manifest.
Finally, if you're using Visual Studio to create a new project and migrate your existing code across, see Create a "Hello, world" app. You can include your existing code into the new project, but you will likely have to make significant code changes (particularly in the user interface) in order to run as a pure UWP app. These changes are outside the scope of this document.
Phase 1: Localize the manifest
Step 1.1: Update strings & assets in the manifest
In Phase 0 you created a basic package manifest (.appxmanifest) file for your application (based on values provided to the converter, extracted from the MSI, or manually entered into the manifest) but it will not contain localized information, nor will it support additional features like high-resolution Start tile assets, etc.
To ensure your application's name and description are correctly localized, you must define some resources in a set of resource files, and update the package manifest to reference them.
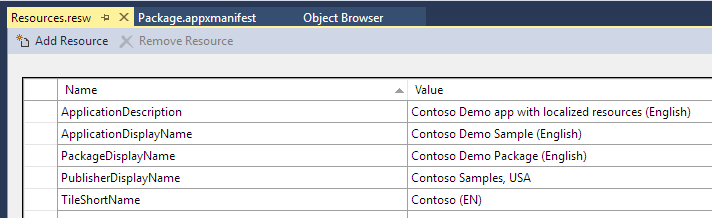
Creating a default resource file
The first step is to create a default resource file in your default language (eg, US English). You can do this either manually with a text editor, or via the Resource Designer in Visual Studio.
If you want to create the resources manually:
- Create an XML file named
resources.reswand place it in aStrings\en-ussubfolder of your project. Use the appropriate BCP-47 code if your default language is not US English. - In the XML file, add the following content, where the highlighted text is replaced with the appropriate text for your app, in your default language.
Note
There are restrictions on the lengths of some of these strings. For more info, see VisualElements.
<?xml version="1.0" encoding="utf-8"?>
<root>
  <data name="ApplicationDescription">
    <value>Contoso Demo app with localized resources (English)</value>
  </data>
  <data name="ApplicationDisplayName">
    <value>Contoso Demo Sample (English)</value>
  </data>
  <data name="PackageDisplayName">
    <value>Contoso Demo Package (English)</value>
  </data>
  <data name="PublisherDisplayName">
    <value>Contoso Samples, USA</value>
  </data>
  <data name="TileShortName">
    <value>Contoso (EN)</value>
  </data>
</root>
If you want to use the designer in Visual Studio:
- Create the
Strings\en-usfolder (or other language as appropriate) in your project and add a New Item to the root folder of your project, using the default name ofresources.resw. Be sure to choose Resources File (.resw) and not Resource Dictionary - a Resource Dictionary is a file used by XAML applications. - Using the designer, enter the following strings (use the same
Namesbut replace theValueswith the appropriate text for your application):
Note
If you start with the Visual Studio designer, you can always edit the XML directly by pressing F7. But if you start with a minimal XML file, the designer will not recognize the file because it's missing a lot of additional metadata; you can fix this by copying the boilerplate XSD information from a designer-generated file into your hand-edited XML file.
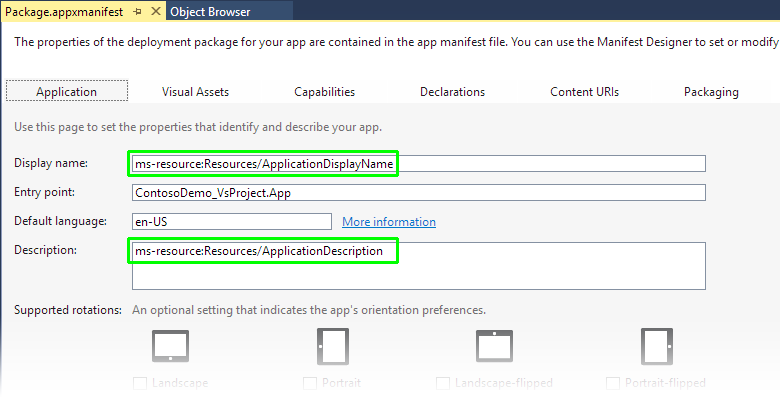
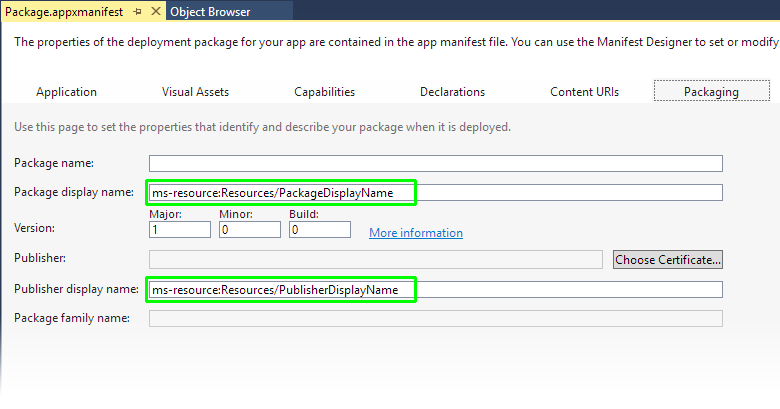
Update the manifest to reference the resources
After you have the values defined in the .resw file, the next step is to update the manifest to reference the resource strings. Again, you can edit an XML file directly, or rely on the Visual Studio Manifest Designer.
If you are editing XML directly, open the AppxManifest.xml file and make the following changes to the highlighted values - use this exact text, not text specific to your application. There is no requirement to use these exact resource names—you can choose your own—but whatever you choose must exactly match whatever is in the .resw file. These names should match the Names you created in the .resw file, prefixed with the ms-resource: scheme and the Resources/ namespace.
Note
Many elements of the manifest have been omitted from this snippet - do not delete anything!
<?xml version="1.0" encoding="utf-8"?>
<Package>
  <Properties>
    <DisplayName>ms-resource:Resources/PackageDisplayName</DisplayName>
    <PublisherDisplayName>ms-resource:Resources/PublisherDisplayName</PublisherDisplayName>
  </Properties>
  <Applications>
    <Application>
      <uap:VisualElements DisplayName="ms-resource:Resources/ApplicationDisplayName"
        Description="ms-resource:Resources/ApplicationDescription">
        <uap:DefaultTile ShortName="ms-resource:Resources/TileShortName">
          <uap:ShowNameOnTiles>
            <uap:ShowOn Tile="square150x150Logo" />
          </uap:ShowNameOnTiles>
        </uap:DefaultTile>
      </uap:VisualElements>
    </Application>
  </Applications>
</Package>
If you are using the Visual Studio manifest designer, open the .appxmanifest file and change the highlighted values values in the *Application tab and the Packaging tab:
Step 1.2: Build PRI file, make an MSIX package, and verify it's working
You should now be able to build the .pri file and deploy the application to verify that the correct information (in your default language) is appearing in the Start Menu.
If you're building in Visual Studio, simply press Ctrl+Shift+B to build the project and then right-click on the project and choose Deploy from the context menu.
If you're building manually, follow these steps to create a configuration file for MakePRI tool and to generate the .pri file itself (more information can be found in Manual app packaging):
Open a developer command prompt from the Visual Studio 2017 or Visual Studio 2019 folder in the Start menu.
Switch to the project root directory (the one that contains the .appxmanifest file and the Strings folder).
Type the following command, replacing "contoso_demo.xml" with a name suitable for your project, and "en-US" with the default language of your app (or keep it en-US if applicable). Note the XML file is created in the parent directory (not in the project directory) since it's not part of the application (you can choose any other directory you want, but be sure to substitute that in future commands).
makepri createconfig /cf ..\contoso_demo.xml /dq en-US /pv 10.0 /oYou can type
makepri createconfig /?to see what each parameter does, but in summary:/cfsets the Configuration Filename (the output of this command)/dqsets the Default Qualifiers, in this case the languageen-US/pvsets the Platform Version, in this case Windows 10/osets it to Overwrite the output file if it exists
Now you have a configuration file, run
MakePRIagain to actually search the disk for resources and package them into a PRI file. Replace "contoso_demop.xml" with the XML filename you used in the previous step, and be sure to specify the parent directory for both input and output:makepri new /pr . /cf ..\contoso_demo.xml /of ..\resources.pri /mf AppX /oYou can type
makepri new /?to see what each parameter does, but in a nutshell:/prsets the Project Root (in this case, the current directory)/cfsets the Configuration Filename, created in the previous step/ofsets the Output File/mfcreates a Mapping File (so we can exclude files in the package in a later step)/osets it to Overwrite the output file if it exists
Now you have a
.prifile with the default language resources (eg, en-US). To verify that it worked correctly, you can run the following command:makepri dump /if ..\resources.pri /of ..\resources /oYou can type
makepri dump /?to see what each parameter does, but in a nutshell:/ifsets the Input Filename/ofsets the Output Filename (.xmlwill be appended automatically)/osets it to Overwrite the output file if it exists
Finally, you can open
..\resources.xmlin a text editor and verify it lists your<NamedResource>values (likeApplicationDescriptionandPublisherDisplayName) along with<Candidate>values for your chosen default language (there will be other content in the beginning of the file; ignore that for now).
You can open the mapping file ..\resources.map.txt to verify it contains the files needed for your project (including the PRI file, which is not part of the project's directory). Importantly, the mapping file will not include a reference to your resources.resw file because the contents of that file have already been embedded in the PRI file. It will, however, contain other resources like the filenames of your images.
Building and signing the package
Now the PRI file is built, you can build and sign the package:
To create the app package, run the following command replacing
contoso_demo.appxwith the name of the .msix/.appx file you want to create and making sure to choose a different directory for the file (this sample uses the parent directory; it can be anywhere but should not be the project directory).makeappx pack /m AppXManifest.xml /f ..\resources.map.txt /p ..\contoso_demo.appx /oYou can type
makeappx pack /?to see what each parameter does, but in a nutshell:/msets the Manifest file to use/fsets the mapping File to use (created in the previous step)/psets the output Package name/osets it to Overwrite the output file if it exists
After the package is created, it must be signed. The easiest way to get a signing certificate is by creating an empty Universal Windows project in Visual Studio and copying the
.pfxfile it creates, but you can create one manually using theMakeCertandPvk2Pfxutilities as described in How to create an app package signing certificate.Important
If you manually create a signing certificate, make sure you place the files in a different directory than your source project or your package source, otherwise it might get included as part of the package, including the private key!
To sign the package, use the following command. Note that the
Publisherspecified in theIdentityelement of theAppxManifest.xmlmust match theSubjectof the certificate (this is not the<PublisherDisplayName>element, which is the localized display name to show to users). As usual, replace thecontoso_demo...filenames with the names appropriate for your project, and (very important) make sure the.pfxfile is not in the current directory (otherwise it would have been created as part of your package, including the private signing key!):signtool sign /fd SHA256 /a /f ..\contoso_demo_key.pfx ..\contoso_demo.appxYou can type
signtool sign /?to see what each parameter does, but in a nutshell:/fdsets the File Digest algorithm (SHA256 is the default for .appx)/awill Automatically select the best certificate/fspecifies the input File that contains the signing certificate
Finally, you can now double-click on the .appx file to install it, or if you prefer the command-line you can open a PowerShell prompt, change to the directory containing the package,
and type the following (replacing contoso_demo.appx with your package name):
add-appxpackage contoso_demo.appx
If you receive errors about the certificate not being trusted, make sure it is added to the machine store (not the user store). To add the certificate to the machine store, you can either use the command-line or Windows Explorer.
To use the command-line:
Run a Visual Studio 2017 or Visual Studio 2019 command prompt as an Administrator.
Switch to the directory that contains the
.cerfile (remember to ensure this is outside of your source or project directories!)Type the following command, replacing
contoso_demo.cerwith your filename:certutil -addstore TrustedPeople contoso_demo.cerYou can run
certutil -addstore /?to see what each parameter does, but in a nutshell:-addstoreadds a certificate to a certificate storeTrustedPeopleindicates the store into which the certificate is placed
To use Windows Explorer:
- Navigate to the folder that contains the
.pfxfile - Double-click on the
.pfxfile and the Certicicate Import Wizard should appear - Choose
Local Machineand clickNext - Accept the User Account Control admin elevation prompt, if it appears, and click
Next - Enter the password for the private key, if there is one, and click
Next - Select
Place all certificates in the following store - Click
Browse, and choose theTrusted Peoplefolder (not "Trusted Publishers") - Click
Nextand thenFinish
After adding the certificate to the Trusted People store, try installing the package again.
You should now see your app appear in the Start Menu's "All Apps" list, with the correct information from the .resw / .pri file. If you see a blank string or the string ms-resource:... then something has gone wrong - double check your edits and make sure they're correct. If you right-click on your app in the Start Menu, you can Pin it as a tile and verify the correct information is displayed there also.
Step 1.3: Add more supported languages
After the changes have been made to the package manifest and the initial resources.resw file has been created, adding additional languages is easy.
Create additional localized resources
First, create the additional localized resource values.
Within the Strings folder, create additional folders for each language you support using the appropriate BCP-47 code (for example, Strings\de-DE). Within each of these folders,
create a resources.resw file (using either an XML editor or the Visual Studio designer) that includes the translated resource values. It is assumed you already have the localized
strings available somewhere, and you just need to copy them into the .resw file; this document does not cover the translation step itself.
For example, the Strings\de-DE\resources.resw file might look like this, with the highlighted text changed from en-US:
<?xml version="1.0" encoding="utf-8"?>
<root>
  <data name="ApplicationDescription">
    <value>Contoso Demo app with localized resources (German)</value>
  </data>
  <data name="ApplicationDisplayName">
    <value>Contoso Demo Sample (German)</value>
  </data>
  <data name="PackageDisplayName">
    <value>Contoso Demo Package (German)</value>
  </data>
  <data name="PublisherDisplayName">
    <value>Contoso Samples, DE</value>
  </data>
  <data name="TileShortName">
    <value>Contoso (DE)</value>
  </data>
</root>
The following steps assume you added resources for both de-DE and fr-FR, but the same pattern can be followed for any language.
Update the package manifest to list supported languages
The package manifest must be updated to list the languages supported by the app. The Desktop App Converter adds the default language, but the others must be added explicitly. If you're editing the AppxManifest.xml file directly, update the Resources node as follows, adding as many elements as you need, and substituting the appropriate languages you support and making sure the first entry in the list is the default (fallback) language.
In this example, the default is English (US) with additional support for both German (Germany) and French (France):
<Resources>
  <Resource Language="EN-US" />
  <Resource Language="DE-DE" />
  <Resource Language="FR-FR" />
</Resources>
If you are using Visual Studio, you shouldn't need to do anything; if you look at Package.appxmanifest you should see the special x-generate value, which causes the build process to insert the languages it finds in your project (based on the folders named with BCP-47 codes). Note that this is not a valid value for a real package manifest; it only works for Visual
Studio projects:
<Resources>
  <Resource Language="x-generate" />
</Resources>
Re-build with the localized values
Now you can build and deploy your application, again, and if you change your language preference in Windows you should see the newly-localized values appear in the Start menu (instructions for how to change your language are below).
For Visual Studio, again you can just use Ctrl+Shift+B to build, and right-click the project to Deploy.
If you're manually building the project, follow the same steps as above but add the additional languages, separated by underscores, to the default qualifiers list (/dq) when creating
the configuration file. For example, to support the English, German, and French resources added in the previous step:
makepri createconfig /cf ..\contoso_demo.xml /dq en-US_de-DE_fr-FR /pv 10.0 /o
This will create a PRI file that contains all the specified languagesthat you can easily use for testing. If the total size of your resources is small, or you only support a small number of languages, this might be acceptable for your shipping app; it's only if you want the benefits of minimizing install / download size for your resources that you need to do the additional work of building separate language packs.
Test with the localized values
To test the new localized changes, you simply add a new preferred UI language to Windows. There is no need to download language packs, reboot the system, or have your entire Windows UI appear in a foreign language.
- Run the
Settingsapp (Windows + I) - Go to
Time & language - Go to
Region & language - Click
Add a language - Type (or select) the language you want (eg
DeutschorGerman)
- If there are sub-languages, choose the one you want (eg,
Deutsch / Deutschland)
- Select the new language in the language list
- Click
Set as default
Now open the Start menu and search for your application, and you should see the localized values for the selected language (other apps might also appear localized). If you don't see the localized name right away, wait a few minutes until the Start Menu's cache is refreshed. To return to your native language, just make it the default language in the language list.
Step 1.4: Localizing more parts of the package manifest (optional)
Other sections of the package manifest can be localized. For example, if your application handles file-extensions then it should have a windows.fileTypeAssociation extension in the manifest, using the green highlighted text exactly as shown (since it will refer to resources), and replacing the
yellow highlighted text with information specific to your application:
<Extensions>
  <uap:Extension Category="windows.fileTypeAssociation">
    <uap:FileTypeAssociation Name="default">
      <uap:DisplayName>ms-resource:Resources/FileTypeDisplayName</uap:DisplayName>
      <uap:Logo>Assets\StoreLogo.png</uap:Logo>
      <uap:InfoTip>ms-resource:Resources/FileTypeInfoTip</uap:InfoTip>
      <uap:SupportedFileTypes>
        <uap:FileType ContentType="application/x-contoso">.contoso</uap:FileType>
      </uap:SupportedFileTypes>
    </uap:FileTypeAssociation>
  </uap:Extension>
</Extensions>
You can also add this information using the Visual Studio Manifest Designer, using the Declarations tab, taking note of the
highlighted values:

Now add the corresponding resource names to each of your .resw files, replacing the highlighted text with the appropriate text for your app (remember to do this for each supported language!):
... existing content...
<data name="FileTypeDisplayName">
  <value>Contoso Demo File</value>
</data>
<data name="FileTypeInfoTip">
  <value>Files used by Contoso Demo App</value>
</data>
This will then show up in parts of the Windows shell, such as File Explorer:

Build and test the package as before, exercising any new scenarios that should show the new UI strings.
Phase 2: Use MRT to identify and locate resources
The previous section showed how to use MRT to localize your app's manifest file so that the Windows Shell can correctly display the app's name and other metadata. No code changes were required for this; it simply required the use of .resw files and some additional tools. This section will show how to use MRT to locate resources in your existing resource formats and using your existing resource-handling code with minimal changes.
Assumptions about existing file layout & application code
Because there are many ways to localize Win32 Desktop apps, this paper will make some simplifying assumptions about the existing application's structure that you will need to map to your specific environment. You might need to make some changes to your existing codebase or resource layout to conform to the requirements of MRT, and those are largely out of scope for this document.
Resource file layout
This article assumes your localized resources all have the same filenames (eg, contoso_demo.exe.mui or contoso_strings.dll or contoso.strings.xml) but that they are placed
in different folders with BCP-47 names (en-US, de-DE, etc.). It doesn't matter how many resource files you have, what their names are, what their file-formats / associated APIs
are, etc. The only thing that matters is that every logical resource has the same filename (but placed in a different physical directory).
As a counter-example, if your application uses a flat file-structure with a single Resources directory containing the files english_strings.dll and french_strings.dll, it
would not map well to MRT. A better structure would be a Resources directory with subdirectories and files en\strings.dll and fr\strings.dll. It's also possible to use the same base filename but with embedded qualifiers, such as strings.lang-en.dll and strings.lang-fr.dll, but using directories with the language codes is conceptually simpler so it's what we'll focus on.
Note
It is still possible to use MRT and the benefits of packaging even if you can't follow this file naming convention; it just requires more work.
For example, the application might have a set of custom UI commands (used for button labels etc.) in a simple text file named ui.txt, laid out under a UICommands folder:
+ ProjectRoot
|--+ Strings
|  |--+ en-US
|  |  \--- resources.resw
|  \--+ de-DE
|     \--- resources.resw
|--+ UICommands
|  |--+ en-US
|  |  \--- ui.txt
|  \--+ de-DE
|     \--- ui.txt
|--- AppxManifest.xml
|--- ...rest of project...
Resource loading code
This article assumes that at some point in your code you want to locate the file that contains a localized resource, load it, and then use it. The APIs used to load the resources, the APIs used to extract the resources, etc. are not important. In pseudocode, there are basically three steps:
set userLanguage = GetUsersPreferredLanguage()
set resourceFile = FindResourceFileForLanguage(MY_RESOURCE_NAME, userLanguage)
set resource = LoadResource(resourceFile)

// now use 'resource' however you want
MRT only requires changing the first two steps in this process - how you determine the best candidate resources and how you locate them. It doesn't require you to change how you load or use the resources (although it provides facilities for doing that if you want to take advantage of them).
For example, the application might use the Win32 API GetUserPreferredUILanguages, the CRT function sprintf, and the Win32 API CreateFile to replace the three pseudocode functions
above, then manually parse the text file looking for name=value pairs. (The details are not important; this is merely to illustrate that MRT has no impact on the techniques used to
handle resources once they have been located).
Step 2.1: Code changes to use MRT to locate files
Switching your code to use MRT for locating resources is not difficult. It requires using a handful of WinRT types and a few lines of code. The main types that you will use are as follows:
- ResourceContext, which encapsulates the currently active set of qualifier values (language, scale factor, etc.)
- ResourceManager (the WinRT version, not the .NET version), which enables access to all the resources from the PRI file
- ResourceMap, which represents a specific subset of the resources in the PRI file (in this example, the file-based resources vs. the string resources)
- NamedResource, which represents a logical resource and all its possible candidates
- ResourceCandidate, which represents a single concrete candidate resource
In pseudo-code, the way you would resolve a given resource file name (like UICommands\ui.txt in the sample above) is as follows:
// Get the ResourceContext that applies to this app
set resourceContext = ResourceContext.GetForViewIndependentUse()

// Get the current ResourceManager (there's one per app)
set resourceManager = ResourceManager.Current

// Get the "Files" ResourceMap from the ResourceManager
set fileResources = resourceManager.MainResourceMap.GetSubtree("Files")

// Find the NamedResource with the logical filename we're looking for,
// by indexing into the ResourceMap
set desiredResource = fileResources["UICommands\ui.txt"]

// Get the ResourceCandidate that best matches our ResourceContext
set bestCandidate = desiredResource.Resolve(resourceContext)

// Get the string value (the filename) from the ResourceCandidate
set absoluteFileName = bestCandidate.ValueAsString
Note in particular that the code does not request a specific language folder - like UICommands\en-US\ui.txt - even though that is how the files exist on-disk. Instead, it
asks for the logical filename UICommands\ui.txt and relies on MRT to find the appropriate on-disk file in one of the language directories.
From here, the sample app could continue to use CreateFile to load the absoluteFileName and parse the name=value pairs just as before; none of that logic needs to change in the
app. If you are writing in C# or C++/CX, the actual code is not much more complicated than this (and in fact many of the intermediate variables can be elided) - see the section on Loading .NET
resources, below. C++/WRL-based applications will be more complex due to the low-level COM-based APIs used to activate and call the WinRT APIs, but the fundamental steps you take are
the same - see the section on Loading Win32 MUI resources, below.
Loading .NET resources
Because .NET has a built-in mechanism for locating and loading resources (known as "Satellite Assemblies"), there is no explicit code to replace as in the synthetic example above - in .NET you just need your resource DLLs in the appropriate directories and they are automatically located for you. When an app is packaged as an MSIX or .appx using resource packs, the directory structure is somewhat different - rather than having the resource directories be subdirectories of the main application directory, they are peers of it (or not present at all if the user doesn't have the language listed in their preferences).
For example, imagine a .NET application with the following layout, where all the files exist under the MainApp folder:
+ MainApp
|--+ en-us
|  \--- MainApp.resources.dll
|--+ de-de
|  \--- MainApp.resources.dll
|--+ fr-fr
|  \--- MainApp.resources.dll
\--- MainApp.exe
After conversion to .appx, the layout will look something like this, assuming en-US was the default language and the user has both German and French listed in their language list:
+ WindowsAppsRoot
|--+ MainApp_neutral
|  |--+ en-us
|  |  \--- MainApp.resources.dll
|  \--- MainApp.exe
|--+ MainApp_neutral_resources.language_de
|  \--+ de-de
|     \--- MainApp.resources.dll
\--+ MainApp_neutral_resources.language_fr
   \--+ fr-fr
      \--- MainApp.resources.dll
Because the localized resources no longer exist in sub-directories underneath the main executable's install location, the built-in .NET resource resolution fails. Luckily, .NET has
a well-defined mechanism for handling failed assembly load attempts - the AssemblyResolve event. A .NET app using MRT must register for this event and provide the missing assembly
for the .NET resource subsystem.
A concise example of how to use the WinRT APIs to locate satellite assemblies used by .NET is as follows; the code as-presented is intentionally compressed to show a minimal implementation,
although you can see it maps closely to the pseudo-code above, with the passed-in ResolveEventArgs providing the name of the assembly we need to locate. A runnable version of this code
(with detailed comments and error-handling) can be found in the file PriResourceRsolver.cs in the .NET Assembly Resolver sample on GitHub.
static class PriResourceResolver
{
  internal static Assembly ResolveResourceDll(object sender, ResolveEventArgs args)
  {
    var fullAssemblyName = new AssemblyName(args.Name);
    var fileName = string.Format(@"{0}.dll", fullAssemblyName.Name);

    var resourceContext = ResourceContext.GetForViewIndependentUse();
    resourceContext.Languages = new[] { fullAssemblyName.CultureName };

    var resource = ResourceManager.Current.MainResourceMap.GetSubtree("Files")[fileName];

    // Note use of 'UnsafeLoadFrom' - this is required for apps installed with .appx, but
    // in general is discouraged. The full sample provides a safer wrapper of this method
    return Assembly.UnsafeLoadFrom(resource.Resolve(resourceContext).ValueAsString);
  }
}
Given the class above, you would add the following somewhere early-on in your application's startup code (before any localized resources would need to load):
void EnableMrtResourceLookup()
{
  AppDomain.CurrentDomain.AssemblyResolve += PriResourceResolver.ResolveResourceDll;
}
The .NET runtime will raise the AssemblyResolve event whenever it can't find the resource DLLs, at which point the provided event handler will locate the desired file via MRT and return the assembly.
Note
If your app already has an AssemblyResolve handler for other purposes, you will need to integrate the resource-resolving code with your existing code.
Loading Win32 MUI resources
Loading Win32 MUI resources is essentially the same as loading .NET Satellite Assemblies, but using either C++/CX or C++/WRL code instead. Using C++/CX allows for much simpler code that closely matches the C# code above, but it uses C++ language extensions, compiler switches, and additional runtime overheard you might wish to avoid. If that is the case, using C++/WRL provides a much lower-impact solution at the cost of more verbose code. Nevertheless, if you are familiar with ATL programming (or COM in general) then WRL should feel familiar.
The following sample function shows how to use C++/WRL to load a specific resource DLL and return an HINSTANCE that can be used to load further resources using the usual Win32
resource APIs. Note that unlike the C# sample that explicitly initializes the ResourceContext with the language requested by the .NET runtime, this code relies on the user's current
language.
#include <roapi.h>
#include <wrl\client.h>
#include <wrl\wrappers\corewrappers.h>
#include <Windows.ApplicationModel.resources.core.h>
#include <Windows.Foundation.h>

#define IF_FAIL_RETURN(hr) if (FAILED((hr))) return hr;

HRESULT GetMrtResourceHandle(LPCWSTR resourceFilePath,  HINSTANCE* resourceHandle)
{
  using namespace Microsoft::WRL;
  using namespace Microsoft::WRL::Wrappers;
  using namespace ABI::Windows::ApplicationModel::Resources::Core;
  using namespace ABI::Windows::Foundation;

  *resourceHandle = nullptr;
  HRESULT hr{ S_OK };
  RoInitializeWrapper roInit{ RO_INIT_SINGLETHREADED };
  IF_FAIL_RETURN(roInit);

  // Get Windows.ApplicationModel.Resources.Core.ResourceManager statics
  ComPtr<IResourceManagerStatics> resourceManagerStatics;
  IF_FAIL_RETURN(GetActivationFactory(
    HStringReference(
    RuntimeClass_Windows_ApplicationModel_Resources_Core_ResourceManager).Get(),
    &resourceManagerStatics));

  // Get .Current property
  ComPtr<IResourceManager> resourceManager;
  IF_FAIL_RETURN(resourceManagerStatics->get_Current(&resourceManager));

  // get .MainResourceMap property
  ComPtr<IResourceMap> resourceMap;
  IF_FAIL_RETURN(resourceManager->get_MainResourceMap(&resourceMap));

  // Call .GetValue with supplied filename
  ComPtr<IResourceCandidate> resourceCandidate;
  IF_FAIL_RETURN(resourceMap->GetValue(HStringReference(resourceFilePath).Get(),
    &resourceCandidate));

  // Get .ValueAsString property
  HString resolvedResourceFilePath;
  IF_FAIL_RETURN(resourceCandidate->get_ValueAsString(
    resolvedResourceFilePath.GetAddressOf()));

  // Finally, load the DLL and return the hInst.
  *resourceHandle = LoadLibraryEx(resolvedResourceFilePath.GetRawBuffer(nullptr),
    nullptr, LOAD_LIBRARY_AS_DATAFILE | LOAD_LIBRARY_AS_IMAGE_RESOURCE);

  return S_OK;
}
Phase 3: Building resource packs
Now that you have a "fat pack" that contains all resources, there are two paths towards building separate main package and resource packages in order to minimize download and install sizes:
- Take an existing fat pack and run it through the Bundle Generator tool to automatically create resource packs. This is the preferred approach if you have a build system that already produces a fat pack and you want to post-process it to generate the resource packs.
- Directly produce the individual resource packages and build them into a bundle. This is the preferred approach if you have more control over your build system and can build the packages directly.
Step 3.1: Creating the bundle
Using the Bundle Generator tool
In order to use the Bundle Generator tool, the PRI config file created for the package needs to be manually updated to remove the <packaging> section.
If you're using Visual Studio, refer to Ensure that resources are installed on a device regardless of whether a device requires them for information on
how to build all languages into the main package by creating the files priconfig.packaging.xml and priconfig.default.xml.
If you're manually editing files, follow these steps:
Create the config file the same way as before, substituting the correct path, file name and languages:
makepri createconfig /cf ..\contoso_demo.xml /dq en-US_de-DE_es-MX /pv 10.0 /oManually open the created
.xmlfile and delete the entire<packaging&rt;section (but keep everything else intact):<?xml version="1.0" encoding="UTF-8" standalone="yes" ?> <resources targetOsVersion="10.0.0" majorVersion="1"> <!-- Packaging section has been deleted... --> <index root="\" startIndexAt="\"> <default> ... ...Build the
.prifile and the.appxpackage as before, using the updated configuration file and the appropriate directory and file names (see above for more information on these commands):makepri new /pr . /cf ..\contoso_demo.xml /of ..\resources.pri /mf AppX /o makeappx pack /m AppXManifest.xml /f ..\resources.map.txt /p ..\contoso_demo.appx /oAFter the package has been created, use the following command to create the bundle, using the appropriate directory and file names:
BundleGenerator.exe -Package ..\contoso_demo.appx -Destination ..\bundle -BundleName contoso_demo
Now you can move to the final step, signing (see below).
Manually creating resource packages
Manually creating resource packages requires running a slightly different set of commands to build separate .pri and .appx files - these are all similar to the commands used above to create fat packages, so minimal explanation is given. Note: All the commands assume that the current directory is the directory containing the AppXManifest.xml file, but all files are placed into the parent directory (you can use a different directory, if necessary, but you shouldn't pollute the project directory with any of these files). As always, replace the "Contoso" filenames with your own file names.
Use the following command to create a config file that names only the default language as the default qualifier - in this case,
en-US:makepri createconfig /cf ..\contoso_demo.xml /dq en-US /pv 10.0 /oCreate a default
.priand.map.txtfile for the main package, plus an additional set of files for each language found in your project, with the following command:makepri new /pr . /cf ..\contoso_demo.xml /of ..\resources.pri /mf AppX /oUse the following command to create the main package (which contains the executable code and default language resources). As always, change the name as you see fit, although you should put the package in a separate directory to make creating the bundle easier later (this example uses the
..\bundledirectory):makeappx pack /m .\AppXManifest.xml /f ..\resources.map.txt /p ..\bundle\contoso_demo.main.appx /oAfter the main package has been created, use the following command once for each additional language (ie, repeat this command for each language map file generated in the previous step). Again, the output should be in a separate directory (the same one as the main package). Note the language is specified both in the
/foption and the/poption, and the use of the new/rargument (which indicates a Resource Package is desired):makeappx pack /r /m .\AppXManifest.xml /f ..\resources.language-de.map.txt /p ..\bundle\contoso_demo.de.appx /oCombine all the packages from the bundle directory into a single
.appxbundlefile. The new/doption specifies the directory to use for all the files in the bundle (this is why the.appxfiles are put into a separate directory in the previous step):makeappx bundle /d ..\bundle /p ..\contoso_demo.appxbundle /o
The final step to building the package is signing.
Step 3.2: Signing the bundle
Once you have created the .appxbundle file (either through the Bundle Generator tool or manually) you will have a single file that contains the main package plus all the resource
packages. The final step is to sign the file so that Windows will install it:
signtool sign /fd SHA256 /a /f ..\contoso_demo_key.pfx ..\contoso_demo.appxbundle
This will produce a signed .appxbundle file that contains the main package plus all the language-specific resource packages. It can be double-clicked just like a package file to
install the app plus any appropriate language(s) based on the user's Windows language preferences.
Related topics
Feedback
Coming soon: Throughout 2024 we will be phasing out GitHub Issues as the feedback mechanism for content and replacing it with a new feedback system. For more information see: https://aka.ms/ContentUserFeedback.
Submit and view feedback for