I use Azure Web Apps (formerly Websites) a lot. I run a few production sites, I run test sites and proof of concept projects. The whole process of publishing to Azure has become so easy and so FREE, that I have all but eliminated all other options. You can manage your sites from the portal(GUI), FTP, PowerShell, Visual Studio, Command Line, you name it. Everything can be scripted and everything can be automated so what's not to love about the platform?
One important aspect of working with clients on new products or new features is testing. Testing in QA and UAT, A/B testing and so on are integral parts of the process in order to ensure that the product is a fit for purpose and all bugs have been fixed before shipping.
In the traditional world, beta/uat/etc testing was carried out in separate environments. The production site run on standalone server(s), the QA and UAT on separate servers and so on. Moving stuff between environments required a series of backups, deployment scripts, scheduled downtime etc.
In the Azure world, the logical separation of environments (QA, UAT, PROD) can easily be accomplished with the use of deployment slots. Within the same website configuration, you can create multiple slots where you can deploy different versions of your code, i.e dev, staging, qa, uat, etc. and can all be accessed through the browser using the right url prefix.
Slot configuration in Azure (GUI edition)
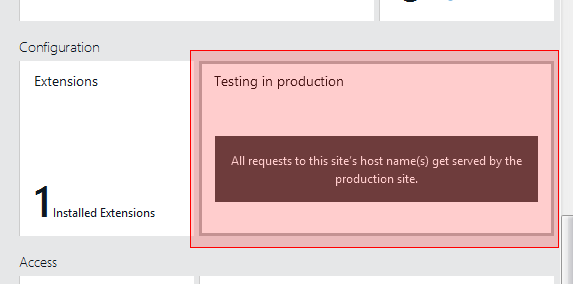
Log in to the Azure Portal and navigate to the website you wish to add a slot. Click on the Settings tile, scroll down and find the Testing in production tile under the Configuration section.
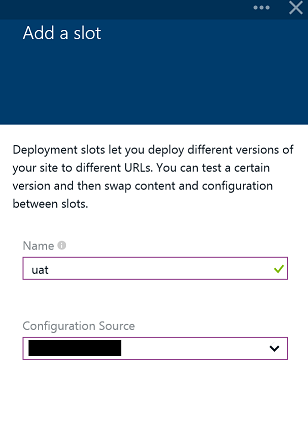
On the newly openned blade, click on Add Slot. On the new blade that opens, type a name, for example uat and in the Configuration source either select <yoursitename> if you wish to clone your current site or select "Don't Clone..." if you wish to deploy a different version of the site to that slot. Then press OK to create the new slot.
Slot configuration in Azure (PS edition)
With PowerShell, things are always much simpler, as long as you know what you are doing. Once you open a new Azure PowerShell session, select the right subscription, you are good to start
# list all the websites first
Get-AzureWebsite

# find the one you want to add the slot to, then type
New-AzureWebsite <nameOfyourWebsite> -Slot <nameOfNewSlot> -Location <SameLocationAsYourSite>
With these two commands you accomplish the same result as in the previous step. And it's much faster!
Testing using slots
With the slots in place, you can now freely upload your code and test the new features or bug fixes you've implemented. The use of slots comes with the following benefits:
- each slot comes with it's own separate endpoint url so that you can browse to it
- you can use continuous deployment to constantly push the latest code to the slot
- you can manually push the changes as you wish.
- you can seamlessly deploy a slot to production using the Swap opeation. No backups, no hassle.
- by deploying a site to a slot first and swapping it into production ensures that all instances of the slot are warmed up before being swapped into production.
- Swapping eliminates downtime when pusing a slot to production as the traffic redirection is seamless, and no requests are dropped as a result of swap operations
If there are any issues, you can swap to the previous "working version" of your site. I don't think a deploymen to production can be as easy as this.
Obviously this works fine for small, self-contained sites. Larger solution will involve additional steps such as database changes, custom scrips etc.
NOTE: There is one important thing you need to be aware of regarding slots: they share the same resource so if you plan on performing stress testing, then you could affect your production site. There is an option to move the test site/slot to a separate resource group and I would highly recommend doing that.
Cutting edge A/B testing
Let's assume that your code is ready for production but you don't want to roll it out 100%. You don't want to fully retire/swap out the current site, but instead you want to keep both versions running side-by-side. "Back in the day", this kind of setup would require the introduction of a load balancer with the appropriate configuration settings and so on. Not an easy task. In the new world, Azure rocks again with the introduction of "Testing In Production". This feature is based on slots, but it gives you the option to automatically load balance a percentage of the traffic going to your site between production and your designated slot(s). In a typical scenario, you could have 70% of the traffic going to the old version and 30% to the new one. This way you can test in production new features or bug fixes and collect immmediate feedback. If anything's wrong with the new code, you can simply stop all traffic to the corresponding slot. Simple as that.
To configure this in the Azure Portal, select the site in question and hit the "Testing in Production" tile. On the new blade, allocate the percentages you wish to allocate to each slot and ensure they all amount to 100%. Yes, you can have multiple slots sharing the traffic, if this is necessary.
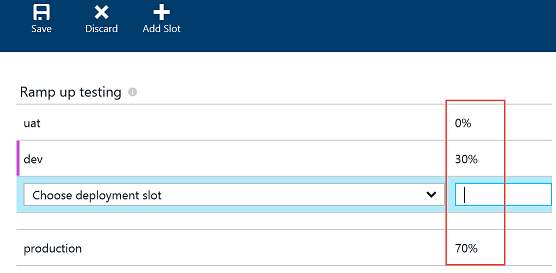
Ensure that you hit Save when you are done with the settings.
If you are more comfortable using Powershell, then you can even add extra logic to slowly bump up the percentage at a certain interval until you hit a set maximum percentage. A possible scenario would be to start the slot under test at 5% and increment 5% every 10 minutes until it reaches 50%. The sample script was provided by the excellent Galin Iliev of the Azure team.
$siteName = "yourProductionSiteName"
$rule1 = New-Object Microsoft.WindowsAzure.Commands.Utilities.Websites.Services.WebEntities.RampUpRule
$rule1.ActionHostName = "yourSlotSiteName"
$rule1.ReroutePercentage = 10;
$rule1.Name = "stage"

$rule1.ChangeIntervalInMinutes = 10;
$rule1.ChangeStep = 5;
$rule1.MinReroutePercentage = 5;
$rule1.MaxReroutePercentage = 50;
$rule1.ChangeDecisionCallbackUrl = "callBackUrlOfyourChoice-Optional"

Set-AzureWebsite $siteName -Slot Production -RoutingRules $rule1