A multi-player server-side GameBoy Emulator written in .NET Core and Angular
 One of the great joys of sharing and discovering code online is when you stumble upon something so truly epic, so amazing, that you have to dig in. Head over to https://github.com/axle-h/Retro.Net and ask yourself why this GitHub project has only 20 stars?
Alex Haslehurst has created some retro hardware libraries in open source .NET Core with an Angular Front End!
Translation?
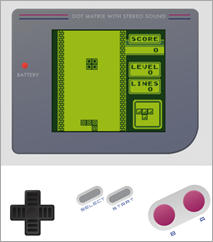
A multiplayer server-side Game Boy emulator. Epic.
You can run it in minutes with
docker run -p 2500:2500 alexhaslehurst/server-side-gameboy
Then just browse to http://localhost:2500 and play Tetris on the original GameBoy!
I love this for a number of reasons.
First, I love his perspective:
Please check out my GameBoy emulator written in .NET Core; Retro.Net. Yes, a GameBoy emulator written in .NET Core. Why? Why not. I plan to do a few write-ups about my experience with this project. Firstly: why it was a bad idea.
The biggest issue one has trying to emulate a CPU with a platform like .NET is the lack of reliable high-precision timing. However, he manages a nice from-scratch emulation of the Z80 processor, modeling low level things like registers in very high level C#. I love that public class GameBoyFlagsRegister is a thing. ;) I did similar things when I ported a 15 year old "Tiny CPU" to .NET Core/C#.
Be sure to check out Alex's extremely detailed explanation on how he modeled the Z80 microprocessor.
Luckily the GameBoy CPU, a Sharp LR35902, is derived from the popular and very well documented Zilog Z80 - A microprocessor that is unbelievably still in production today, over 40 years after it’s introduction.
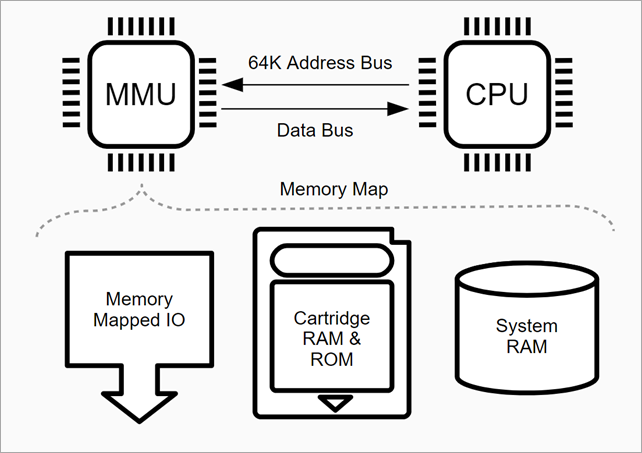
The Z80 is an 8-bit microprocessor, meaning that each operation is natively performed on a single byte. The instruction set does have some 16-bit operations but these are just executed as multiple cycles of 8-bit logic. The Z80 has a 16-bit wide address bus, which logically represents a 64K memory map. Data is transferred to the CPU over an 8-bit wide data bus but this is irrelevant to simulating the system at state machine level. The Z80 and the Intel 8080 that it derives from have 256 I/O ports for accessing external peripherals but the GameBoy CPU has none - favouring memory mapped I/O instead
He didn't just create an emulator - there's lots of those - but uniquely he runs it on the server-side while allowing shared controls in a browser. "In between each unique frame, all connected clients can vote on what the next control input should be. The server will choose the one with the most votes… most of the time." Massively multi-player online GameBoy! Then he streams out the next frame! "GPU rendering is completed on the server once per unique frame, compressed with LZ4 and streamed out to all connected clients over websockets."
This is a great learning repository because:
- it has complex business logic on the server-side but the front end uses Angular and web-sockets and open web technologies.
- It's also nice that he has a complete multi-stage Dockerfile that is itself a great example of how to build both .NET Core and Angular apps in Docker.
- Extensive (thousands) of Unit Tests with the Shouldly Assertion Framework and Moq Mocking Framework.
- Great example usages of Reactive Programming
- Unit Testing on both server AND client, using Karma Unit Testing for Angular
Here's a few favorite elegant code snippets in this huge repository.
The Reactive Button Presses:
_joyPadSubscription = _joyPadSubject
    .Buffer(FrameLength)
    .Where(x => x.Any())
    .Subscribe(presses =>
                {
                    var (button, name) = presses
                        .Where(x => !string.IsNullOrEmpty(x.name))
                        .GroupBy(x => x.button)
                        .OrderByDescending(grp => grp.Count())
                        .Select(grp => (button: grp.Key, name: grp.Select(x => x.name).First()))
                        .FirstOrDefault();
                    joyPad.PressOne(button);
                    Publish(name, $"Pressed {button}");

                    Thread.Sleep(ButtonPressLength);
                    joyPad.ReleaseAll();
                });
The GPU Renderer:
private void Paint()
{
    var renderSettings = new RenderSettings(_gpuRegisters);

    var backgroundTileMap = _tileRam.ReadBytes(renderSettings.BackgroundTileMapAddress, 0x400);
    var tileSet = _tileRam.ReadBytes(renderSettings.TileSetAddress, 0x1000);
    var windowTileMap = renderSettings.WindowEnabled ? _tileRam.ReadBytes(renderSettings.WindowTileMapAddress, 0x400) : new byte[0];

    byte[] spriteOam, spriteTileSet;
    if (renderSettings.SpritesEnabled) {
        // If the background tiles are read from the sprite pattern table then we can reuse the bytes.
        spriteTileSet = renderSettings.SpriteAndBackgroundTileSetShared ? tileSet : _tileRam.ReadBytes(0x0, 0x1000);
        spriteOam = _spriteRam.ReadBytes(0x0, 0xa0);
    }
    else {
        spriteOam = spriteTileSet = new byte[0];
    }

    var renderState = new RenderState(renderSettings, tileSet, backgroundTileMap, windowTileMap, spriteOam, spriteTileSet);

    var renderStateChange = renderState.GetRenderStateChange(_lastRenderState);
    if (renderStateChange == RenderStateChange.None) {
        // No need to render the same frame twice.
        _frameSkip = 0;
        _framesRendered++;
        return;
    }

    _lastRenderState = renderState;
    _tileMapPointer = _tileMapPointer == null ? new TileMapPointer(renderState) : _tileMapPointer.Reset(renderState, renderStateChange);
    var bitmapPalette = _gpuRegisters.LcdMonochromePaletteRegister.Pallette;
    for (var y = 0; y < LcdHeight; y++) {
        for (var x = 0; x < LcdWidth; x++) {
            _lcdBuffer.SetPixel(x, y, (byte) bitmapPalette[_tileMapPointer.Pixel]);

            if (x + 1 < LcdWidth) {
                _tileMapPointer.NextColumn();
            }
        }

        if (y + 1 < LcdHeight){
            _tileMapPointer.NextRow();
        }
    }

    _renderer.Paint(_lcdBuffer);
    _frameSkip = 0;
    _framesRendered++;
}
The GameBoy Frames are composed on the server side then compressed and sent to the client over WebSockets. He's got backgrounds and sprites working, and there's still work to be done.
The Raw LCD is an HTML5 canvas:
<canvas #rawLcd [width]="lcdWidth" [height]="lcdHeight" class="d-none"></canvas>
<canvas #lcd
        [style.max-width]="maxWidth + 'px'"
        [style.max-height]="maxHeight + 'px'"
        [style.min-width]="minWidth + 'px'"
        [style.min-height]="minHeight + 'px'"
        class="lcd"></canvas>
I love this whole project because it has everything. TypeScript, 2D JavaScript Canvas, retro-gaming, and so much more!
const raw: HTMLCanvasElement = this.rawLcdCanvas.nativeElement;
const rawContext: CanvasRenderingContext2D = raw.getContext("2d");
const img = rawContext.createImageData(this.lcdWidth, this.lcdHeight);

for (let y = 0; y < this.lcdHeight; y++) {
  for (let x = 0; x < this.lcdWidth; x++) {
    const index = y * this.lcdWidth + x;
    const imgIndex = index * 4;
    const colourIndex = this.service.frame[index];
    if (colourIndex < 0 || colourIndex >= colours.length) {
      throw new Error("Unknown colour: " + colourIndex);
    }

    const colour = colours[colourIndex];

    img.data[imgIndex] = colour.red;
    img.data[imgIndex + 1] = colour.green;
    img.data[imgIndex + 2] = colour.blue;
    img.data[imgIndex + 3] = 255;
  }
}
rawContext.putImageData(img, 0, 0);

context.drawImage(raw, lcdX, lcdY, lcdW, lcdH);
I would encourage you to go STAR and CLONE https://github.com/axle-h/Retro.Net and give it a run with Docker! You can then use Visual Studio Code and .NET Core to compile and run it locally. He's looking for help with GameBoy sound and a Debugger.
Sponsor: Get the latest JetBrains Rider for debugging third-party .NET code, Smart Step Into, more debugger improvements, C# Interactive, new project wizard, and formatting code in columns.
About Scott
Scott Hanselman is a former professor, former Chief Architect in finance, now speaker, consultant, father, diabetic, and Microsoft employee. He is a failed stand-up comic, a cornrower, and a book author.
About Newsletter
Comments are closed.

